Pages

Wednesday, December 23, 2015

One Last Christmas Display

Hello all and welcome back to the blog today. I have one more Christmas display to show you prior to Christmas. Cutting it close on this one haha! 
I have recently gotten my hands on the new Tim Holtz Paper Mosaic Kit from my work Simple Pleasures and I couldn't wait to break it open and play with it. 
Ever since I saw Tim's video on youtube with this kit, I've been wanting to check it out


To begin this project I took a piece out of Tim's configuration book, I'm going to create a scene inside this. 

I started out by using the Distress grout onto the entire backside of the box, I used a pallet knife to spread my grout. I probably should have made it a bit smoother but since this was my first time, it was a learning process
(for some reason my photo wouldn't stay upright for this post, sorry about that.)


I sat that aside to dry thoroughly

While that was drying I started with some things for the scene I was going to create.
I used Tim's Trophy Antlers and applied some multi matte medium all over them and sprinkled glitter onto them
Also, setting that aside to dry

I then cut a piece of Tim's older Christmas paper and used distress ink to the edges and top. I used the paper distress tool to distress my edges as well


I wanted to add a poinsettia to this so I created a small one using Tim's movers and shapers poinsettia die. I simply cut these out with red and green paper that i previously stamped music onto, I then used distress ink on the edges


I wanted to use glitter and prills for the center and I applied these with glossy accents glue


I love how the center looks so real with the prills and glitter

Once my "grout" was completely dry, I began by placing some of my mosaic pieces here and there onto the back of my box.
(I previously cut the pieces out using Tim's Christmas paper)


Once I figured out how I wanted my pieces to lay out, I started gluing them down with the paper mosaic glue
when they were all placed and glue down I applied one more coat of glue to the entire back


I set this aside to dry

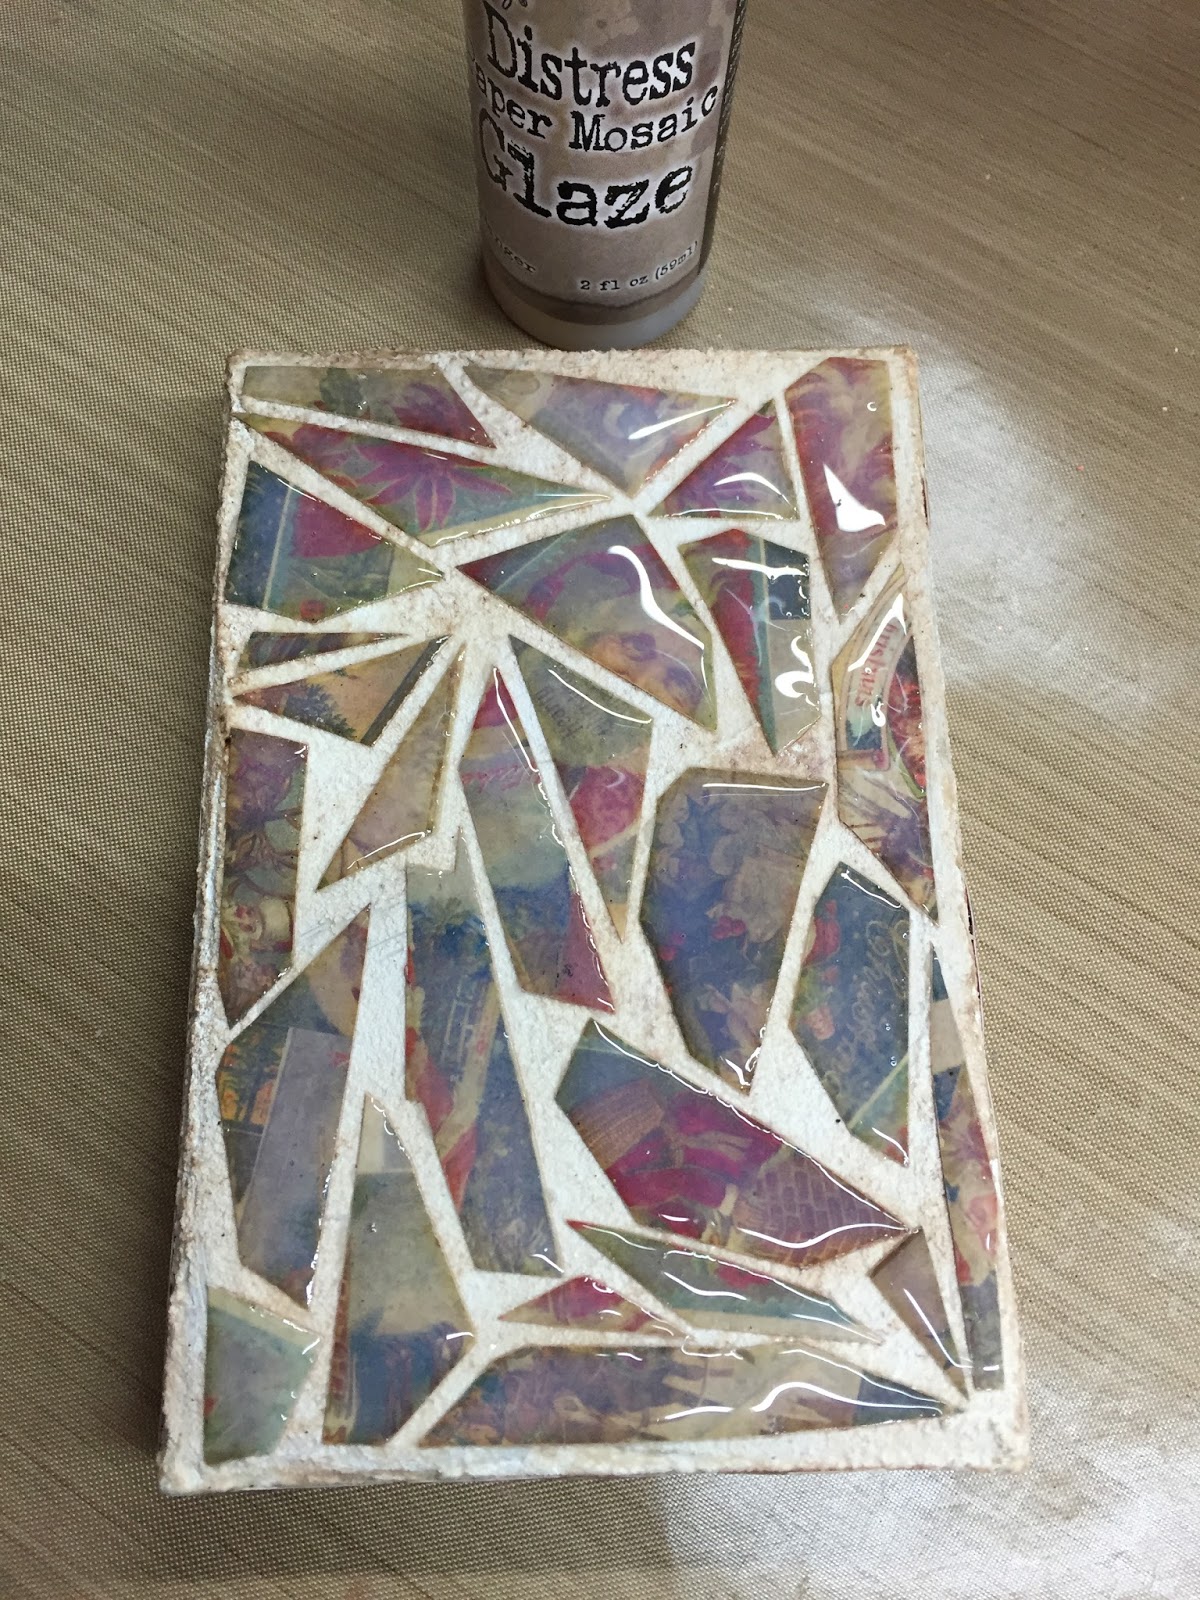
When all of the glue had dried completely I went ahead and applied my paper mosaic glaze over each mosaic tile. Again, I set this aside to dry


I forgot to mention that prior to applying my mosaic pieces I used distress ink to go over the entire background of my box
It's really kind of cool how the distress ink blends into the background as your applying your glue and mosaic pieces


I used one of Tim's script thinlet word dies to create my "joyful" word and I also used one of his woodland tree miniatures (sprayed with distress spray)
For the silver tinsel around the edge, I simply hot glued that


This is how the back and sides turned out, I love it!


Thanks so much for coming by and checking out this fin and festive display. I hope you and yours have a Blessed Christmas!! 
CHEERS!!!


Monday, December 14, 2015

Tim Holtz Flip Frame Christmas Display

Hello and welcome back to the blog today. I had a bit of free time last week, (just a small bit) and I know I haven't been crafting a whole lot lately due to my busy schedule so I wanted to really sit down and go back to some of the things I love to do. 
Tim Holtz has always been one of my favorite styles and designers and as soon as I saw his flip frame, my brain went into overdrive. I love the idea of a flip frame for multiple uses but for today I made a Christmas display.


This Christmas display is loosely based on one of Tim's older 12 tags. It's from his post way back in 2011, if you want to check out Tim's tutorial here is the link

On the edges of the frame I added some snowflake paste so it looked like there was little snow, I sat that aside to dry.
(Snowflake paste is something that my store Simple Pleasures where I work sells it and  has gotten it in stock like 3 times and it keeps selling out, we cannot keep the stuff on the shelves.)


Next, I added some of Tim's Holiday letterpress blocks to the outside of my frame with my glue gun BUT first I added some really nice red glitter to each letter. I simply added a little glossy accents to the front of the letters and dipped them into the red glitter face first, setting them aside to dry


my last step was the centerpiece, which was mostly explained on Tim's Blog with his 12 Tags of 2011 Tag 2 
I used the general idea for the reindeer and background for my display. Tim used Seasonal Craft Resist for the background behind his reindeer and I am out of the seasonal SO, I used some of the butterfly craft paper that I had. To add the resist, I used versamark and stamped the word "Believe" from the stamp set called Handwritten Holidays.  I then used clear embossing powder to heat set. This way when I went over the entire background with white distress stain, the word "believe" resists the stain, so it pops. 
Once my middle section was mostly complete I added two Jingle Brads to the bottom and also made a poinsettia for the bottom right side. 
My poinsettia was made using Tim's Tattered Poinsettia Die
and for the leaves I used Tim's Holly branch die. I also used these little things called "Prills" in the center of my poinsettia
They are these tiny little beads that you just adhere with glossy accents or any other clear glue. They are fabulous, we have them at Simple Pleasures and we ship!! They are the best thing and they give the center of my poinsettia a realistic look. I also added a touch of gold glitter to them
 Check it out:


I just added a bit of greenery around the reindeer to mimic a wreath and attached an ideology snowflake with burlap ribbon
I love how it turned out, so festive!


This makes a super fun display piece for Christmas. 
I hope you have enjoyed the little tutorial, I'm off to take it to work with me and share it with my co-workers!! 
CHEERS!!


Friday, December 11, 2015

Christmas Gifts using Tim's Holtz Mini Mason Jars

Hello everyone and welcome back to my blog. I'm excited that you have decided to stop by today. 


I have a fun project to show you using Tim Holtz's mini mason jars. These little guys are the cutest ever and the perfect size for a small gift. Of course I have to personalize it for sure. 
I wanted to do something fun for the ladies I work with and I decided to stuff these little jars full of candy and some candy cane chap stick. 
For each Jar I did the following:
I applied a small amount of glossy accents to the front of my Tim's letterpress blocks and dipped each into a different color of glitter. Once dry,  I then attached a screw eye to each letter, hanging one of Tim's little snowflake charms and gluing silver tinsel around the top of each

For the lid, I used Tim's Tissue Paper and colored it with Dina Wakley's red paint.  After that was dry I used multi matte medium to glue the tissue to the lid and trimmed as needed. 
I used a hot glue gun to attach the green tinsel and mini bulb ribbon and also the letterpress letters to the lid. 

That's it! Easy peasy! I hope the ladies like these fun little gifts.
We do sell all of these products at Simple Pleasures (my work) and we ship!!! YAY!


Thanks so much for coming by the blog today, I hope you have a Merry Christmas everyone!! 


Wednesday, December 9, 2015

Stampotique Challenge 225 - Alphabets

Good morning everyone, I hope your having a wonderful week. It's time for another new challenge over at Stampotique Designer's Challenge Blog. This week I am hosting and my challenge to you is "Alphabets" 
Use your alphabet or image stamps to create a letter

I decided to do a journal page for this challenge and here is what I came up with this week


I used Stampotique Stamps:

Never-ending Wall, small - By Arwen McCullen which I used to create my letter "A"
Twinkie - By Daniel Torrente

I sure hope you will come by the Stampotique Designer's Challenge Blog and join us this week. 
Cheers!

Thursday, December 3, 2015

Steampunk Ornament Swap

Hello everyone and welcome back to the blog today. 
I wanted to tell you about a little swap that I did with some friends from Virginia. We have been swapping ornaments off and on for about four years now and since we are all into steampunk and we decided to do a steampunk Christmas ornament swap this year. 
Steampunk is always so fun and creating something in this theme isn't the easiest thing but it sure was fun to do.

This was the ornament I made


I used a old vintage key as my butterfly body and then just added some other elements. I added a vintage looking snowflake to the back of each and a vintage button to one wing
I can't tell you how fun this was to create.

Here are the ornaments that my friends sent to me:

From my friend Chris - the details on this is amazing


and from my friend Deanna - this one is so elegant and beautiful


This was such a fun swap to do and I'm glad I took part. 
Thanks for coming by and enjoy your day. 
Merry Christmas!!

Wednesday, December 2, 2015

Stampotique Challenge 224 - Sequins

Hello all and welcome back to the blog today. I hope all of you in the US had a wonderful Thanksgiving and spent lots of time with family and friends.
This week over at Stampotique  Designer Challenge,  Valerie is our hostess and she is challenging us to use sequins. Here is what Valerie says about this challenge:
"Let's see where your creativity takes you. Sequins come in every size, shape and color and can be used in so many ways. Where will they end up in your project?"

I made a Christmas card for this one:


I have to say that using sequins this week was so fun, I never use sequins in my projects so this was a great challenge.
I used a Stampotique stamp by Daniel Torrente called Santa Baby 

Come on over to the Stampotique Designer's Challenge Blog and join us this week. There will only be two challenges this month but you can still enter all month long to win that 30.00 gift certificate. YAY!!!
Have a wonderful Day!!!

Tuesday, December 1, 2015

Winner of the Watch Part Necklace

Thanks to everyone who supported my Etsy shop by sharing and liking and such. I really appreciate it more than you know. I'm excited about this new adventure, it's always tough starting a new shop and getting the word out so I'm thankful to have such support. 

Without further waiting, the winner of the watch part necklace is...................

"Can't wait to check out your etsy shop...you know you are one of my favorite artists..."

YAY! congrats Jeannie, please email me with your address and I will get your necklace in the mail asap.

to everyone else here is link to my etsy shop I have restocked, below are just a few of the items in the shop. 


Thanks for coming by and cheers to you!!!

Wednesday, November 25, 2015

Stampotique Challenge 223 - Quick and Easy Christmas Cards

Welcome back to the blog today everyone. I hope you are all having a great Thanksgiving week and are ready for some turkey and fixings tomorrow!! 
Today is Wednesday and that means another wonderful challenge over at Stampotique Designer's Challenge Blog
Nellie is our hostess and she is challenging us to "Quick and Easy Christmas Cards"
Here is what she says about this challenge:

"It's that time of year again, that you know you should have started earlier with making your Christmas cards. So now you have to come up with some quick and easy (yet stunning) Christmas cards."

So let's see your best, quick and easy (yet stunning) Christmas Cards.

For this challenge I decided to go little silly yet fun, this card was pretty easy and quick to make.

Stampotique Stamps I used 
Global Warming - By Daniel Torrente


I sure hope you will join us over at Stampotique Designer's Challenge Blog this week for this fast and easy challenge. 
Have a Wonderful Thanksgiving!!!

Saturday, November 21, 2015

Give Away Watch Part Necklace - My etsy Shop

Hello all, as you know I started an etsy shop a couple of weeks ago and I have just re-stocked it. I'm so excited about my new adventure that I really want to do a give-a-way as a way of promoting my shop. 

All you need to do is:

1. share my post on your blog letting people know I'm doing a give away 

2. Share this post on your Facebook page
My post regarding this is HERE

3.  Leave a comment here on this blog post

4. Come by my shop and look around and if you feel so inclined, favorite it too :)

Let me know you've done these things and
That's it, one lucky winner will win this beautiful one of a kind necklace
This will be a random drawing and the deadline for this will be Tuesday December 1st and I will announce here on my blog and on my Facebook page who the lucky winner is. 


Thanks for the support and I hope that you and your friends enjoy checking out the shop, these necklaces are great, one of a kind gifts for friends and family. I'm making more necklaces this weekend so the shop will have even more. 
Thanks for helping me out everyone!! Good luck in the give away.


Wednesday, November 18, 2015

Stampotique Challenge 222 - At The Movies

Hello everyone and welcome back to the blog this fine Wednesday. We, here in Colorado had a snow storm yesterday it was crazy. Not like your normal storm, lots of wind with snow mix.
Here is a photo of my front yard early in the storm, it's much worse now.

I'm taking advantage of the weather and using it to create. Making a few things for my Etsy shop and for Stampotique's design team.

This week over at Stampotique's Designer's Challenge Blog our hostess is Corrie Herriman 
and she is challenging us to "At the Movies" Here is what Corrie says about this challenge:

"Make something this week inspired by a movie or movie star"

So let's see your best "At The Movies" projects

I decided to create in my art journal this week and I had previously created this really cool background and decided to use this to make something


I just love The Hunger Games movies and in the second movie, Catching Fire, there was this really cool, kind of eerie song that Katniss sang and I just love it, so I used a few of the lyrics on my page along with France Papillon's Majestic Tree


I just love how this page came out and I hope you will join us over at Stampotique's Designer's Challenge Blog this week for this fun challenge. Thanks for coming by the blog.
CHEERS!

Friday, November 13, 2015

Art Journaling in My Tag Book

Hello all and welcome back to the blog, thanks again for stopping by. Today I am sharing page #2 in my tag book that I am making while following along in Marjie Kemper's online class with Craftsy. I posted the first page HERE if you missed it. 

This page is a two section spread and following along with Marjie's class I created this....


The quote on this page is something that my friend Terri and I say all the time, it's become one of my favorite quotes. haha!

I can't tell you how much fun I had creating this page, Marjie is so awesome at explaining what to do and easy to follow along. 
I used various stencils on this page and Stampotique Stamps:
Dwindled and Froggie both by Artist Daniel Torrente

Thanks for coming by, have a wonderful day!!

Wednesday, November 11, 2015

Stampotique Challenge 221 - Take a Box

Hello all and welcome back to another week of Stampotique's Designer Challenge... this week Samantha Read is our hostess and she has challenged us to "Take a Box"
Here is what she says about this fun challenge:

"I think we all have boxes that we throw away and so this week I'm inviting you to take an empty cardboard box and and later and decorate it to your hearts content.I can't wait to see your boxes, have fun!"

I decided to take an old box and use it as a box for a gift I wanted to give someone for Christmas. I made my own wrapping paper for this with my Stampotique Stamps

It was so fun to do this wrapping paper, I used a pice of thinner paper rather than cardstock so that it would be easy to bend and maneuver to wrap my box. 
I just randomly stamped my images all over the paper and colored them with Copic markers
Stampotique stamps I used are:
Christmas Cubed 5 sided by Daniel Torrente
Tree-O and Candy Cane- By Jo Capper-Sandon
Cross Hatch Swirl - By Maryse Carrier


On the tag I used Stampotique Stamps:

Christmas Ornaments Cube  and Snowy Fran - By artist Daniel Torrente


I hope you have enjoyed my project for this challenge. Come by the Stampotique's Designer Challenge and join us, you could always win a 30.00 gift certificate to the online store. We give away 2 a month. :)
CHEERS!!!