Pages

Showing posts with label Simple Pleasures. Show all posts

Sunday, December 18, 2016

One Card 3 Different Ways

Hello and thanks for stopping by the blog today. I hope you are all ready for Christmas, it's coming pretty fast, can you believe how quickly it comes and then goes?
I was perusing Pinterest the other day, as I usually do and I found a great card that I wanted to take inspiration from. I can't give anyone credit for the inspiration because the photo doesn't link back to a blog or anything but whomever you are, thank you for the inspiration for this project.
I decided to make a similar card BUT I wanted to show the versatility of Stampotique stamps and make this card, three different but similar ways using Stampotique stamps.

The first one I did was this one, using Karen Hayselden's Safina Stamp

The gold paper in the background is Tim Holtz Deco Sheets, these are fabulous thin sheets of glittery paper with a self adhesive backing. The Ribbon is also a Tim Holtz product
The snowflake die comes from Memory Box and it's called Dazzling Snowflake

Next up I used a stamp by Kate Crane called Christmas Boots
This is the cutest bunny in a santa suit and I thought it worked so great on the card 
I also used words by Kate Crane, these words come on the side with Peace and Love Angel


The background was made exactly the same as the one above, the dimensions are different I made this card taller to accommodate the bunny

and lastly for this card I used the Hohoho words from the stamp by Karen Hayselden Holly Wally

Tracy Scott's Stamp called  Lola

Daniel Torrente's stamp called Christmas Cubed


This time I used silver Tim Holtz Deco Sheets behind the red and a blue card base.

I hope you enjoyed seeing how the same card can be done three different ways but still be so precious. I love how each one has it's own personality


Thanks for stopping by today. 
If your in the Colorado Springs area stop by Simple Pleasures and say Hi. We have all of these products in stock!!


For more inspiration on Stampotique see us on
and

Friday, January 8, 2016

A Valentine Card, Minc Machine Fun!!!

Hello everyone, thanks for coming by the blog today. I wanted to share with you my new Minc Machine
I received this for Christmas and I could not wait to get it out and play with it. I was so excited. It's not something I would have bought myself but boy am I happy that I got it as a gift! 


I didn't previously know how to use the machine but it comes with a nice set of instructions. Very simple, I bet I was up and going in about 10 minutes. 

I also found a nice video on this from last years CHA here:

I bought a set of butterfly applications and also some words. I didn't use the words, I decided to use my pen and write my own word. Here is a link so you can see what the pen looks like
Minc Toner Pen ... it's out of stock everywhere but if you can find one it's definitely worth it. 
It uses ink toner to write with, which is what you need in order to foil anything.


I ended up foiling a butterfly with light pink foil and also my word "Love" that I had written with the pen
It's really hard to see the shine but they both came out fabulous!!


I used American Craft paper for my beautiful rose background
Here is my finished Valentine card


I have to say I LOVE this machine. I will be using much more in the future. 
Thanks for coming by the blog today. 
HUGS!!!
p.s. - we have all these products at the store where I work, and we ship!!!  (the pen is out of stock but we do have more on order)

Friday, September 18, 2015

More Fun with My Filofax - Making your own Dividers and Calendar

Welcome back to the blog, today I want to talk about my filofax. I recently bought a new one from my Local Store (Simple Pleasures Rubber Stamps and Scrapbooking) where I work. My boss got in some Personal Maldens and Oh my word! I fell in love with them. They are so soft and fabulous.
At any rate I had to purchase the purple one


I previously had an A5 that I was using, you can see the size difference here:


These are some of the pages I preciously made for my larger A5 - I blogged about that here:


I had set up my A5 to be my all around planner BUT I really like the size of the Malden because it fits nicely into my purse. What I decided to do was switch from my A5 to my Malden and use my A5 as my "Design Team" planner at home and Keeping track of everything I do with the Stampotique Design Team
It's not easy to make the switch and it took me a few days, here is what I started with..

I made some section dividers, these were made with Bella Blvd Patterned Acrylic, it's perfect to cut down to size and use for dividers and there are so many fun patterns to choose from


I also cut a sheet of the same acrylic to use for washi tape, I wrapped my tape around the sheet and it's perfect because the washi just comes right off of it and doesn't stick, so I can use it in my planner


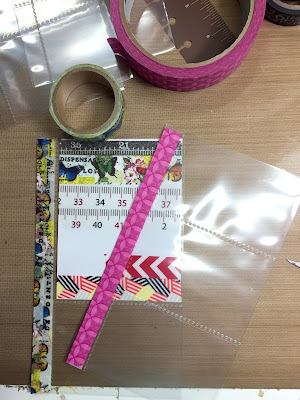
I also used Tim Holtz pocket sleeves to create some pockets for my filofax. These are great because they are thin but sturdy. They are not created specifically for the filofax so I had to create my own holes. I first added colorful washi tape to my edge, preparing them for the new holes
I used my crop a dile and a template to punch the perfect holes
These sleeves are great for holding washi tape paper, business cards, photos and so much more


This is a photo of my washi tape holder and my Tim Holtz pocket page together. You can see that I used the Tim Holtz pocket for my colored tape

This is my front page, as you can see I have my credit cards and business frequent shopper cards here, I also created a bookmark with my Bella Blvd Acrylic.


Lastly I created a Work Schedule monthly page so that I can easily look here to see what days I work and what days I am off work
For this I started with a sheet of paper that was exactly the size I needed for my planner, I wanted a full month on one page and the planner is small so I simply created it.
I then traced this same calendar onto a 81/2x11 sheet of printer paper. Once that was done I wrote the days. This way I can make copies whenever I need to and I don't have to do this step again

I then used photo corners on top of my divider in order to insert my calendar onto the page, this makes it easy to take it out each month and replace it again with a new month and schedule. I love it!

Here is a close up of the photo corners

(yes we have Marjie Kemper coming to teach at the store, I wrote that in pink, it's special haha!)

So my final insert looks like this:


Well hopefully this gives you some ideas on how to make some of these things for yourself instead of buying them. I always love the idea of making things I need, it just makes it more special and personal. I know switching over to a new planner isn't easy and it's a process but these tips might help you make it easier.

We have all of the supplies used in the post in the store
Simple Pleasures Rubber Stamps and Scrapbooking
719-528-1338

Thanks for stopping by!!