Pages

Wednesday, January 27, 2016

Stampotique Challenge 229 - Two Much Fun

Hello all and welcome back to the blog today. This week over at  Stampotique our hostess is Valerie and her challenge is "Two Much Fun"
This is what Valerie says about this challenge:
"This week let's feature two's. You can interpret this any way you want. Duos, Mirrors, the number 2, duplicates - whatever comes to mind"
I decided to work in my tag book that my friend Terri sent me. I'm not sure what I was thinking when I began this page but I like how it turned out haha!

I used Stampotique Stamps

Reggie and Rudy - By Artist Daniel Torrente


In this background I used some stencils and clear embossing paste, Dina Wakley's paints and some other misc stencils. 
The "Friends" word is a thinlits die by Tim Holtz.

Come on over to the Stampotique  Designer's Challenge Blog and join us this week. There is also a ton of inspiration from our design team. 
For even more inspiration see us on
and

Wednesday, January 20, 2016

Stampotique Challenge 228 - Hues of Reds and Pinks

Hello all and welcome back to the blog today. It's Wednesday again so time for another challenge over at Stampotique

Sue Davies is our hostess this week and she is challenging us to use "Hues of Reds and Pinks"

Since Valentine's day is coming up this is the perfect challenge.
Here is what Sue says about this challenge:

"With Valentine's Day around the corner we have all seen hues of reds and pinks, I challenge you to create a Stampotique Valentine's Day creation inspired by reds and pinks"

For this challenge, I decided to go clean and simple and make a Valentine's Day card


For this card I used Janet Klein's image Cowardly Lion from Stampotique. 

Come on over to the Stampotique  Designer's Challenge Blog and join us this week.
For more inspiration see us on
and


Wednesday, January 13, 2016

Stampotique Challenge - 227 Color Blobs

Hello everyone and welcome back to the blog today. It's Wednesday and that means another challenge over at Stampotique Designer's Bog

This week Arwen McCullen is our hostess and she is challenging us to "Color Blobs" she wants to see blobs of different colors in your design this week.


For this challenge I decided to do a journal page. I love the idea of colorful blobs all over my page. 
I used Tim Holtz Distress stains on my background and kind of just blobbed them on. I love that splatter effect

I used Designer Magda Polokow's stamp called Young Ignis
I think anytime your just vegging with your
favorite stuffed animal it's a "happy" time. 
I also used Daniel Torrente's Circle Cube in the upper lefthand corner of this page. I colored each circle the colors of my background. 


Come on over to the Stampotique Challenge blog and join us this week

For more inspiration see us on
and

Friday, January 8, 2016

A Valentine Card, Minc Machine Fun!!!

Hello everyone, thanks for coming by the blog today. I wanted to share with you my new Minc Machine
I received this for Christmas and I could not wait to get it out and play with it. I was so excited. It's not something I would have bought myself but boy am I happy that I got it as a gift! 


I didn't previously know how to use the machine but it comes with a nice set of instructions. Very simple, I bet I was up and going in about 10 minutes. 

I also found a nice video on this from last years CHA here:

I bought a set of butterfly applications and also some words. I didn't use the words, I decided to use my pen and write my own word. Here is a link so you can see what the pen looks like
Minc Toner Pen ... it's out of stock everywhere but if you can find one it's definitely worth it. 
It uses ink toner to write with, which is what you need in order to foil anything.


I ended up foiling a butterfly with light pink foil and also my word "Love" that I had written with the pen
It's really hard to see the shine but they both came out fabulous!!


I used American Craft paper for my beautiful rose background
Here is my finished Valentine card


I have to say I LOVE this machine. I will be using much more in the future. 
Thanks for coming by the blog today. 
HUGS!!!
p.s. - we have all these products at the store where I work, and we ship!!!  (the pen is out of stock but we do have more on order)

Wednesday, January 6, 2016

Stampotique Challenge 226 - Trees

Happy New Year and thanks for coming by the blog today. This is the first challenge for Stampotique in the new year and I'm really excited. 

I am hosting this one and my challenge to you is "Trees"

"Trees have always been such a source life for many living creatures, I just love them. I am challenging you to create something with trees"

My project is a journal page


This page was so much fun and I used Stampotique stamps:

Agatha Traveler - By artist Magda Polokow
Dog CubeTree - By Artist Daniel Torrente
I really hope you will come by our Stampotique Designer's Challenge Blog and join us this week. We always have two lucky 30.00 winners each month.
Also, if your not a member of our Facebook group, come and join us for lots of inspiration.
CHEERS!!!

Sunday, January 3, 2016

Flip Frame Butterfly Project

Hello everyone and welcome back to the blog. Today I would like to share a tutorial on how I made this beautiful flip frame. The flip frame is by Ranger and Tim Holtz and I think there is a ton of potential on what you can do with it.

To begin, I grabbed a piece of cardboard (cut to fit the flip frame) and glued a piece of cardstock to it. I chose this paper because I really like the light green and also the images


I knew I wanted to use the Tim Holtz Mosaic kit again (I used this on the last Christmas project I made)
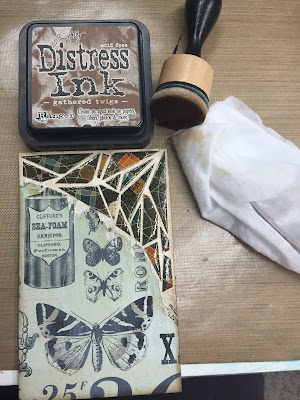
I began by adding the grout to my background in the area I wanted to do mosaic. I set this aside to dry thoroughly

While that was drying I began working on my tiles.. I grabbed some printed paper and cut it into the mosaic shapes

I also stamped my butterfly image onto white cardstock and colored it with copic markers
This butterfly came from the stamp set called "Perspective"

I also used some thin metal wire to go around my butterfly's body and used this as the antenna 

Once my background grout was dry I began glueing my mosaic piecing onto it with the glue provided in the kit

This is how it looked once I was done


Next I took the glaze and added that to my mosaic tiles
This is where it starts to look so cool
I set this aside to dry


While the glaze was drying I took some black cardstock and cut out the word Majic with Tim's "happy holidays" thinlits set


Once my tiles were dry, I used distress ink on my grout and tiles. I used a wipe to clean the ink off my tiles and it stays on the grout in the background
I also went around all my edges with the ink 

Once all that was done, I played everything out not my background so that I can see what it will look like when it's done before I glue


I used distress stain to color a piece of ribbon for the bottom of my final piece


After everything was done and dry, this is what my piece turned out looking like


I just love it, I think it turned out perfect. The flip frame and mosaic kits are becoming my favorites!!!
Thanks for coming by today. CHEERS!!