Pages

Showing posts with label embossing paste. Show all posts

Wednesday, January 27, 2016

Stampotique Challenge 229 - Two Much Fun

Hello all and welcome back to the blog today. This week over at  Stampotique our hostess is Valerie and her challenge is "Two Much Fun"
This is what Valerie says about this challenge:
"This week let's feature two's. You can interpret this any way you want. Duos, Mirrors, the number 2, duplicates - whatever comes to mind"
I decided to work in my tag book that my friend Terri sent me. I'm not sure what I was thinking when I began this page but I like how it turned out haha!

I used Stampotique Stamps

Reggie and Rudy - By Artist Daniel Torrente


In this background I used some stencils and clear embossing paste, Dina Wakley's paints and some other misc stencils. 
The "Friends" word is a thinlits die by Tim Holtz.

Come on over to the Stampotique  Designer's Challenge Blog and join us this week. There is also a ton of inspiration from our design team. 
For even more inspiration see us on
and

Monday, May 18, 2015

Altered Puzzle Week 4

Welcome back to the blog today, I'm actually posting the challenge this week on time haha!! 
We are onto week 4 of the Altered Puzzle Challenge 


Here are the links to the previous posts for this challenge


Our Facebook group is here:


This week, since we aren't worried about the pieces being flat, I decided to do some embossing and add some embellishments.

I started out with my first piece, painting the background a light brick sort of color


I then used embossing ink and two kinds of powder, I just dabbed the pad directly onto my puzzle piece here and there and added the powder and heat set


Once I was finished I wanted more so I added more....


This was how it was when I finished


I wanted to add a bird of some sort so I used a Dyluisions set and stamped my bird onto some patterned paper
I used clear embossing ink for the bird and cut him out


I added some ink and stenciling to the background
(guess I should have done that before the embossing, o-well)


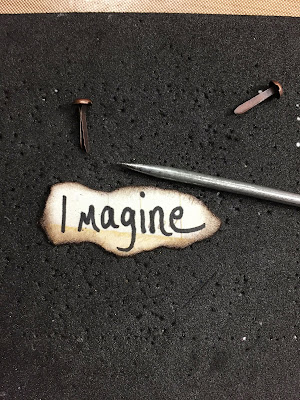
Next I wrote the word Imagine onto the same paper that I stamped the bird and tore it out and inked the edges with brown archival ink


I then punched a hole in each side of the word so that I could add brads


I adhered everything to my background and whalla!! I love the way this piece came out


For my next piece I used DecoArt media paint in a burgundy color


The color was a little bright for what I wanted so I added a bit of a darker color


After that has dried I used a stencil and black embossing paste to add some texture


I really love how that texture came out


I set that aside to dry

for the next step I glued some Tim Holtz paper onto cardboard
and used a butterfly mover and shaper die to cut out


I edged my butterfly with a black marker and I want my wings to stand up so I bent the butterfly right down the center a tad


Next, I grabbed some Tim Holtz ideology flowers and put them together with a brad
I'm going to use this in one corner of my piece


I stamped my sentiment onto that patterned paper and embossed and tore out


I also edged with brown Archival ink


I also wanted to use some pearls on my piece but I didn't want white pearls and that is the only color that I have at the moment. This is a perfect trick - Use your copic markers to color the pearls whatever color you want!!! 


After my background was dry I added everything, I only applied glue to the middle of my butterfly here so that the wings can stand up


and here is my finished puzzle piece


and the two together


I hope that you like the two pieces for this week, they are different but so fun!
This is what your first row should look like now... next week we start on the second row.


Have a great week everyone, see you next Monday!!


Wednesday, May 6, 2015

Stampotique Challenge 194 - Stencils

Welcome back to the blog, thank you for stopping by today. This is Wednesday and this means there is a new challenge over at Stampotique Designer's Challenge Blog, this week our hostess is Corrie and her theme is "Use one or more stencils"
Here is what Corrie says about this challenge:

"Hello and happy Wednesday. I love using stencils. They add another layer to your backgrounds and lots of interest too. Use them with paint, ink, model paste or even gesso. Show me what you do with stencils.. Have fun ! Corrie x"

For Corrie's challenge I wanted to do a journal page. I used a few stencils on my background. 

I started out painting my background with a brownish brick color
I then used a brick stencil and some black Wendy Vecchi embossing paste for my background


I then used white paint and another stencil to add some letters to my background
I used a Gelli pen to add the letter "L"


I added some Stampotique images and a saying.. It was so much fun creating this page.
I like how it looks like a brick wall with graffiti 


Stampotique stamps I used are:
Design Cube 2 By France Papillon 
SkiddyFroggie By Daniel Torrente

Come by the Designer's Challenge and join us this week, I mean, who doesn't like stencils? They are so fun!
Have a great day!!

Monday, May 4, 2015

Altered Puzzle Challenge Week 2

We are onto week 2 of the Altered Puzzle Challenge 


By now you should have your puzzle all prepped with gesso and ready to be altered. If you missed our prep week here is a link:


For my altered puzzle I am going with an overall theme and I have chosen the theme "Favorite Quotes or Bible Verses"
I encourage you to chose a theme for your puzzle as well, it doesn't have to be the same theme, you can do whatever you want. 

So to start I picked out my first two pieces, these pieces were labeled 1 and 2 when I prepped. I am working from the upper right hand corner and across.


I am going to use embossing paste on these two pieces along with this stencil 


For my first piece I am adding a design in the upper corner of my piece


for the 2nd piece I added another design, just here and there


After the embossing paste is done, I set these aside to dry, here is what they look like at this point


I let these dry for a day or so but you can begin to work probably within an hour or so
 starting with piece 1, I began by picking out some Archival ink colors
I am going to use a lighter (yellow) color as my base color 
set the brown color aside for now


I used a distress tool to apply all of my ink colors


After applying the yellow, I wanted another base color around the edge so I grabbed a burnt orange color


I like how it turned out.... I wanted a bit of shimmer in my background so I added some perfect pearls in a gold color


to apply perfect pearls, simply use a paintbrush, water and the pearls
First dip your paintbrush in water and then dip the same brush in the perfect pearls (I used a little on my craft sheet)


The simply swipe your brush onto your project
Once your brush is wet there is no need to wet it again and again, just keep getting more PP and brushing onto your piece


The perfect pearls color is subtle and hard to see in the photo but it did make my piece shimmer

Next, grab that brown archival ink and with a distress tool, very lightly go over the raised portions
this will make your embossed portion really pop off the puzzle piece


I then chose a sentiment from a Wendy Vecchi stamp set. It's one that I've always loved, I stamped it onto white card stock and edged it with black, I then used glue stick to adhere it to my piece


and lastly I wanted a bit of bling.. unlike with the playing cards, with the puzzle pieces we don't care if things are sticking up or raised or even over the edges
I added some gems here and there in two different sizes


Here is my first piece


For piece 2 I went with the same technique for my background but used different colors

I started with a really light blue and applied all over


I then used a light purple color and went around my edges, these colors together were beautiful


Next I used one of Wendy Vecchi stamps on one corner of my piece


I then used my "Wink of Stella" pen to color the frame around my face, it's subtle but it gives a bit of sparkle 


I then used black archival ink to lightly go over my raised embossed pattern to make it a bit more bold
I also added blue gems to my girls design next to her face


I then used some liquid pearls to add dimension to the frame and leaves


Using another Wendy Vecchi stamp I stamped my sentiment onto white card stock and cut out
Here is how my second piece turned out
(the blue in her eye is also a wink of stella glitter pen)

Here are my two first pieces together


I hope you like the first two pieces, you can do whatever you want with your pieces but hopefully you've found some inspiration. 
See you next week with piece 3 and 4