Pages

Monday, October 28, 2013

Love Is A Verb....

.....And so it is!!


It has been a super busy week for me and I haven't been able to update as much as I'd like but I really needed a "crafty" fix so I made myself drop everything and go do art.
For my project today I wanted to partake in a few challenges.

Over at Stampotique Designers Challenge Blog - France is challenging us to use Fabric and or Lace in our projects.

Also, Simon Says Monday Challenge - They are asking us to do "Anything Goes" Woot!

So I decided to break out my gelli plate, which I haven't used since we moved. I just love creating backgrounds and fun things with the gelli plate. It's one of my favorite tools.
I also figured it was time to break out my Claudine Hellmuth, stick back canvas. I squirted out a few different pink colors onto my gelli plate and used my brayer to smooth it out.
I added some designs with a flower stamp and then pressed my sticky back canvas into in the plate.
(please excuse dark or tinted photos, my craft space in our new home doesn't have great lighting, something I hope to fix real soon)


Here is the outcome of the first layer


Then I added another layer of acrylic paint in a bit of a darker tone. I used a foam stamp this time over the paint and then, once again pressed in my canvas.


Here is the outcome of the second layer

I set my canvas aside to dry.
I am going to use a Ranger Jumbo tag for my base to this project and I wanted my base to be black so painted the edges


I also set that aside to dry. 
Here I am using Stampotique Stamp
Girl with a heart purse by artist Jill Penney and Daniel Torrent.
I stamped her onto Ranger stamping paper with Archival ink in jet black.


I then used my copic markers to color her.

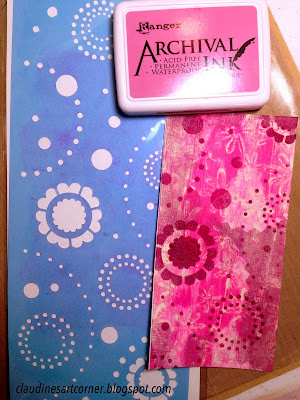
Once my background was dry I wanted to add some depth and dimension so I used a few stencils along with Archival inks to do a little stenciling.


Once all of that was good and dry and all finished, I put the entire tag together, adding some ribbon and a stick pen and also some words.

Check it out.....


Thanks for joining me once again, take care and have a great day!!!

Thursday, October 24, 2013

Back To The Basics

My friend June over at A Creative Dreamer is hosting an ATC swap. I have been trading ATCs for years, so naturally I signed up. I'm so excited to be trading with such a talented group of gals. 
June is giving us the freedom to make anything we want with our creations. I have decided to go back to some basics with Tim Holtz Compendium of Curiosities first book. 
This technique is done with alcohol inks and glossy paper. Tim explains it all on page 51 of the book. If you don't already have this book, you must grab it up, it's so amazing and is full of techniques. 


Once my backgrounds were done, I added a few stamps from some of Tim's stamp sets with Archival ink.


Check out how these background came out! Not one is exactly the same. 
I also made a larger card for a friend of mine.


I stamped one of my favorite sentiments from one of Tim's stamp sets. "In Dreams we catch glimpses of life larger than our own" I just love that quote.


I love how the inks blend so well together on the glossy card stock. Amazing, and one of my favorite techniques. 
Thanks again for stopping by and have a super day!!

Tuesday, October 22, 2013

Give Thanks Postcard

I have been joining in a postcard swap once a month in my yahoo ATC_Fun group and this month we are focusing on Thanksgiving. I really love Thanksgiving because it's a time that we reflect on the year and give thanks for all the wonderful gifts and blessings we have had. We give thanks for friends, family and all the wonderful people who have come in and out of our lives. 
For this postcard I really wanted to focus on giving thanks.


For starters, I sprayed the background with Adirondack color washes in various colors. These sprays are so bright and vivid and really blend well together.
I then used the new Tim Holtz shatter stencil to go over the background.


I got this stencil the other day from Marco's Paper (as soon as I saw it, I pre-ordered it) It's beautiful, I just love the design it leaves. Awesome!!

I used the Tim Holtz Distress Glitter in spiced marmalade for the pumpkin. I really love this glitter, it's my new favorite. It's so pretty.

(sorry forgot to take a photo)
I used a Tim Holtz die to cut out my swirls in brown card stock and then stamped onto them with Espresso Adirondack ink and a large stamp.


I then used a Tim Holtz cat tail stamp and that same Adirondack Espresso pad to stamp onto my background. 


I also cut my letters for my words out of the Tim Holtz Upon A Time letter die strip and brown cardstock.

After all was put together, here is my finished post card.


I just love how that pumpkin pops off the page with that glitter.


Thanks again for stopping by the blog, have a great day!!

Saturday, October 19, 2013

12 Tags of 2013 October

Today I am sharing my October tag project from the Tim Holtz Tags of 2013 .. I am doing the 7 gypsy ATC tray for mine and I am so excited, only two months to go until this entire thing is done. YAY!! 
For the October tag, Tim used some of his distress glitter and let me tell you, this glitter is Ah-Maz-Ing. I really love it, it has glitz like no other.

You can see all the details to make this wonderful tag over on Tim's blog here:

Since I am using the 7 gypsie tray I had to alter my tag a bit to make it smaller. 
I decided to go with the scary cat instead of the owl but I did use distress glitter on both my moon and my cat.


For my background I used Distress paints and Acrylic paint dabber. 

Just look at how cool that background came out. I also used a wood mounted Tim Holtz word stamp. 

For my words, I decided to use the Tim Holtz Simple Sayings Stamp set but I had to make the word frame smaller. I simply stamped my word and cut the frame smaller and taped it together.


I added a few small gems and whalla!! The October ATC/Tag is done.
Look at how cool that distress glitter is, beautiful!!


Almost done with my tray YAY!!!
I am really loving how it's looking. 


Thanks again for stopping by, make sure to check out Tim Holtz's blog for all the wonderful details for the October tag.
Have a great day!!

Thursday, October 17, 2013

Something Wicked

Hello There bloggies... today I have something for you that has been in my head for awhile now and I just haven't had a chance to put it on paper. I decided for the next few challenges that I really wanted to do a tag-ish book. I looked online and couldn't find a tutorial for a tag book anywhere so I just came up with one on my own. 


I am entering this into the following challenges:

Stampotique's Designer Challenge - This week is all about Halloween, this one is a snap for me. I love Halloween

Frilly and Funkie - This week they are challenging us to do a Halloween inspired project with a twist... it must include green and black and absolutely no orange. (that's a toughie)

To begin, I'm going to first say which Stampotique stamps that I used because I used so many and I'm also including the links to where you can find them:

These are all by artists Jill Penney and/or Daniel Torrent

So to get this project started I used some old thick manilla folders to cut into the size tag I wanted to use.
I also knew I wanted to use Tim Holtz ruler binding for the top of my book. I measured out my tag accordingly.


Once those were all cut I used my Tim Holtz distress paints in purple, black and green to color my background.


Just look at the beautiful effect that I got with this paint. It's so pretty and just blends beautifully. I used various different combos of this same color combination for the other four tag backgrounds as well. I set those all aside to dry.


Next I took some mini gravestone cut out (these are just black card stock) and used various colors of embossing powder on them to get an aged sort of look.


I then used clear UTEE to stamp onto them with my Stampotique stamp (Halloween Cube 2)

I then took the gravestone and added a tad bit of perfect pearls just to make that skull stand out a bit more.


I stamped all of my Stampotique girls and Daniel's tree topper onto white card stock and colored each one with Copic markers.
I also made each one of the girls a witch's hat. I just free hand cut those out with black card stock. 


Once my background was dry I stamped it with Archival ink using the Halloween Cube 2 skull side.
I also edged the entire thing with black Archival ink.


I'm so sorry but I didn't do a tutorial for each of the tags BUT I will try to explain how they were done.

This is my front page tag.. I added a buckle and ribbon to her hat and an eye to the crow with smooch ink, I also added the words, a spider web, the ruler top (which I painted with distress paint) a fly and the gravestones.


The second page I added a die cut moon and stamped the background. 
I wanted to break up some of the darkness of the background. 


The third page, I wanted to get a bit silly with it, so I cut the bear's head off and added the crow, he stole her bear's head.
I fussy cut my own spooky tree because I don't have a die so I simply made my own. 

Last but not least, I used Daniel's tree topper for the last page (everyone loves him) I also added a skull in his hands from the gravestones on the front.   I did a black moon and some bats for drama. 


Here are some photos of my finished project. 

Standing up side view, as you can see the screws are long so I can add to this book if I ever want to. Maybe a holiday themed tag book would be cool??!! hmmm! The creative juices are flowing.


I hope that you like the project. I am really loving the color combo. These backgrounds came out amazing and I'm so excited that I finally put some of my favorite Stampotique stamps together in one project. 
Thanks for stopping by, have a spooky day.