Pages

Friday, August 28, 2015

My Filofax Tabs

Hello and welcome to the blog. Today I'd like to talk about my newest obsession, my Filofax. I am loving this organizer and am having so much fun making tabs for it and figuring out how I want to organize it. 

The store where I work,  Simple Pleasures Rubber Stamps and Scrapbooking starting carrying these this month and as soon as I got one I was hooked. My boss Cathy will ship these (or any products) so if you want to buy one make sure to call the store and see what we have in stock. 719-528-1338

Here are some of the tabs I've made for my Filofax
This was the first tab that I made, I used Memorybox stencils and Archival ink. I also used butterfly wash tape around the edges, this one came out simple but I love it
I used a Memory Keeper Punch to make the tabs in the side, labeled "Notes" this is a perfect punch for making tabs, the punch even comes with clear plastic tab covers, its awesome! We also sell the tab punch, stencils and inks at the store


For my next insert I used my round gel plate and Dina Wakley paints to create this fun page. I used several different stencils for the numbers and texture in the background. (this is my budget tab)


For my next insert, I used a combo of acrylic paints and Dina Wakley paints. My stamped images are from Stampotique Originals and I used Copic markers to color them. This is my opening page for my filofax


As you can see I love color, this insert is no exception. I used Tim Holtz Crazy Bird stamp set along with the die set (makes it easier to cut out these cool birds) and colored my images with Copic markers. For my background I used Dina Wakley Paints again and I added some washi tape and doodling. The tab for this page says "Store Cards" I will keep all those darn store cards behind this tab.


Last but not least, I created this insert with Wendy Vecchi crackle texture paste in white and also her regular texture paste, I used the paste through a bunch of different stencils.
Next I added Tim Holtz distress inks in several colors
you can see what colors I used in the photo below
you can also see that I added a tag at the top of this page


I added black cardstock letters cut out with Tim Holtz Word Play Sizzix Die

This tab is going to be my Budget Tab, I switched this one and the gelli plate one from above. That tab was changed to "lists"


So those are my tabs so far, I plan to hopefully make a few more but I think I'm well on my way to having my filofax organized the way I like it. 
All of the products in this post you can get at the store Simple Pleasures Rubber Stamps and Scrapbooking
and this is our Facebook page where you can see more photos of Filofax ideas. 

Take care and thanks for stopping by today


Wednesday, August 26, 2015

Stampotique Challenge 210 - Anything Goes

Welcome back to the blog today, it's Wednesday and you know what that means... we have a new Challenge over at "Stampotique Designer's Blog"

Our hostess is Kim and she is giving us an Anything Goes Challenge. 
Create using freedom this week

Also,  if you haven't already done the New Release Blog Hop, you can start 
There are some wonderful prizes and great inspiration for the design team with the newest stamps.

My creation this week is a Birthday Card using some of the new stamps and some older stamps.

Stampotique Stamps I used are:

Lucilla - By Artist Arwen McCullen
Cup of Fun Certainty and Lovely Wings - by Artist Daniel Torrente

I made this background using my gel plate, I thought it was perfect for this card. I just love Arwen's new Lucilla stamp, she is so fun! 

Come over to the Designer's Challenge Blog and join us this week for this fun and easy challenge. You could win a 30.00 gift certificate to the online store.
Cheers!

Monday, August 24, 2015

Stampotique New Release, Blog Hop and Giveaway

Welcome to the Stampotique New Release and Blog Hop...

You should have arrived from Coby's Blog and if you didn't, you may want to start the blog hop from the beginning at the  Designer's Challenge Blog

If you haven't had a chance to see what's new, you can do that over on the Stampotique's website HERE

We'll be giving away a $30 gift certificate for stamps and a grab bag of stamps on two of the blogs-but you won't know which ones they are, so stop by and visit them all and make sure to comment on each blog along the way. We will pick the winners on our first challenge in September.


For my projects today I did a few Altered Playing Cards


I used Stampotique new release stamps:

Just Keep On and Foxy by Kate Crane
Nina as Frankie and Reindeer By Magda Polakow
Swirlywurly (in the background of the second APC) and
 Tree-O By Jo Capper-Sandon

I also used pre-released stamps:

When I Grow Up - Carol's Collection
Front Door Shrubbery - By Daniel Torrente

I also have a BIG announcement to make, Kim Howard our wonderful and amazing Design Team Coordinator is stepping down after years of leading this wonderful team. 
She will be turning over the reigns to me and I am honored and thrilled to be taking over to lead this superb design team for Stampotique and I thank Kim for all the help and support as I prepare to take over. Kim isn't leaving us for good, she will still be lurking around behind the scenes. I'm sure I speak for everyone on this team when I say a heartfelt "THANK YOU" to Kim for the amazing job she has done.

And with that, I hope you have enjoyed my Altered Playing Cards, Your next stop on the blog hop is:
 Valerie's Blog 

Remember to leave a comment on each blog for your chance to win!! 


CHEERS!!!


Wednesday, August 19, 2015

Stampotique Challenge 209 - Repeat Yourself

Hello all, welcome back to the blog today. Thanks once again for stopping by. 
This is Wednesday and you know what that means, another challenge over at Stampotique Designer's Challenge Blog

This week our hostess is Samantha and her challenge to us is "repeat"
this is what Samantha says about this challenge

"I recently read that the human eye likes things that are repeated, so for this weeks challenge I'm inviting you to use some sort of repetition on your creations. A stamp stamped more than once or even your own doodling, it's up to you but most importantly have fun!"

I have recently gotten into the Filofax craze and got my very first filofax organizer. Mine was simple and didn't come with many things so I created my own tabs and dashboard

For this challenge I decided to create a dashboard with my Stampotique stamps for my filofax

Here is what I came up with:


I used Stampotique stamps:

Circle Cube and Weasel with Thank You on the side - By Daniel Torrente

For the edge I used
Scalloped Lace Border - By Roc Nicholas

I repeated my lace border in order to fill the entire side and I used Weasel twice
I used Dina Wakley's paints on my background and tab
I just love how this page came out, it looks great at the forefront of my Filofax. 

I hope you will come by Stampotique's Designer's Challenge and join us this week. You might end up winning a 30.00 gift certificate to the online store. 
Have a great week!!

Wednesday, August 12, 2015

Stampotique Challenge 208 - Animals

Hello and welcome back to the blog. It's Wednesday and that means it's time for another Stampotique Challenge. 

I get so excited when it's time for another challenge because I love working with my Stampotique Stamps.

This week Jackie Payne is our hostess and she has chosen the theme "Animals" here is what she says about this challenge

"We all love our animals... Incorporate an animal into your project this week"

I decided to make an ATC for this challenge, I love the size and simplicity of an ATC 
I used some of the newest released stamps on this one


Stampotique Stamps I used:
Approach with Caution - By Artist Kate Crane
Skunk - By Kira Nichols
Bee - By Jo Capper-Sandon

I sure hope you will join us this week for this fun challenge. You could win a 30.00 gift certificate to the online store.

CHEERS!!!

Friday, August 7, 2015

August - Roc Nicholas Design Team Post

Hello all and welcome back to the blog today. It is the 7th of the month and it's my turn to post for the Roc Nicholas Design team. 
This month I am using a stamp of Roc's that I just got this month. It's not a new stamp but it's a great one, it's simply called, 


I used the Horse stamp to create a cute bookmark for my books and or art journals. 

This is photo of the front of my bookmark, at this point it looks normal just like a simple stamped and colored image


I colored my image so that the horse has on a pair of glasses (perfect for reading)

from the side it looks like this


I cut out a second piece of thick cardstock to create a back to my bookmark. I then glued the upper portion of the head to the back cardstock so that the bookmark would open in order to place over the books pages


When the bookmark is in the book and the book is closed, I think it's really cute how he looks over the edge, I love it!!


There are many of Roc's stamps that would be so cute as a bookmark like this one, check out all her stamps here:

Have a great day!!!

Wednesday, August 5, 2015

Stampotique Challenge 207 - Selfies and/or Photo Bomb

Hello all and welcome back to the blog, today is Wednesday and you know what that means......
it's time for another Stampotique challenge and this week I am the host!! How fun!

My challenge to you is "Selfies or Photo Bomb"

I think selfies can be so funny and I also know how much the Photo Bomb ATC trade was on the Facebook group so I challenge you to do something either with "Selfies" or "Photo Bomb" as your theme.

For my project this week, I decided to do a birthday card


I used Kate Crane's Sing with Words on Side stamp and sort of "tweaked" her a little so she was taking a selfie. I added a backpack for her best buddy (Dog Cube) and a hat from Daniel Torrente's Hat Cube - I drew my own little cell phone and put it in her hand. I wanted to go with mostly black and white for this card because I really love the simplicity and how there is a pop of color on the hat and pup. 

I hope you will come on over to the Designer's Challenge Blog this week and partake in this fun challenge. Make sure to check out the other design team members blogs too and get some good ideas. 
CHEERS!!!


Monday, August 3, 2015

Altered Puzzle Week 13 - The Last Pieces

Hello and welcome back to the blog today. This is the week 13 post for the Altered Puzzle Challenge and the last post. Can you believe it's already the last post of this challenge? Wow! Suggestions on what we should do next?? Let me know int he comments section.

Here are the links to the previous posts for this challenge


Our Facebook group is here:
Facebook Group

This week I'm doing some simple but fun pieces

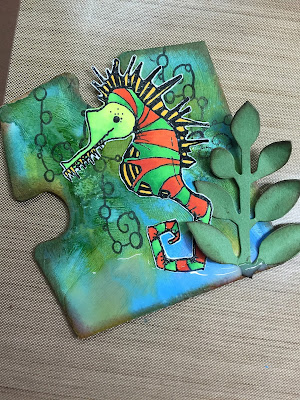
To begin I used Tim Holtz distress paints and spread a few colors on my craft mat... I then spritzed with water and ran my two pieces through the colors


Doing this gives a marbled effect to my backgrounds, it's beautiful, I set those aside to dry completely


Next I took a die cut leaf and my puzzle piece and distressed the edges with some brown archival ink


I stamped the background with a stamp called Seaweed by artist Jo-Capper Sandon and stamped that onto my background.....
I then used a stamp called Reggie by artist Daniel Torrente, stamped and colored him and added him to my background along with my leaf
(both stamps from Stampotique Originals)


I used these little beads called Mini Prills to the bottom of my puzzle piece to imitate sand at the bottom of the sea

I used glossy accents as a glue for this and applied it to the bottom of my piece


I then dropped the "Prills" on top of the glue


Lastly I went around the edges with my Copper pen


 This is my first finished piece, I love those little pills on the bottom, they are so fun


For my next piece I used a couple of stamps from Stampotique as well, these are from the New August release 
One is called - Agatha Flower and the other is Agatha's Watering Can both are by artist Magda Polakow

I simply stamped them, colored and cut them out and glued them on (simple)

I used Distress Glitter in the middle of my flower to make it shine, I applied glossy accents as my glue and sprinkled the glitter onto the flower


Here are both pieces together


and here is the final completed puzzle


and close ups of each side


I have a secret to share with you, remember this piece from week 10? It was a piece that I had done complete as one piece
Well if you look at it closely, I accidentally created the piece upside down. The edge is on the left here and it should be on the right.... Want to know how I fixed it?

My friend Terri Richardson and I brainstormed and she came up with the idea to separate the cardboard top from the bottom
I used my Xacto knife and did just that... you can see here that I flipped the cardboard bottom around


Here I put the top decorated piece over the cardboard piece to see what I need to do to fix it and make the two pieces look right


I ended up decorated potions of the cardboard piece, like the rounded potion on the left, to match my top
Here you can see the top and bottom together after I colored the bottom cardboard piece


Next I glued the top piece to the bottom cardboard piece and cut around the edges to make it look like a piece that was always correct.
In the following photo if you look closely you can see how I had to make adjustments and cut the pieces. The edge is now on the left side of the piece, like it should be


So the piece went from this (upside-down)
To this

Here is the corrected piece in my puzzle


Pretty cool right? Thanks to my friend Terri for the suggestion!! 

Thanks everyone so much for joining me in this challenge, I really hope you had as much fun as I have with this. 
I'm so excited about my finished puzzle, I just love it!! 
I cannot wait to see your final puzzles. 
CHEERS!!!!