
Hello and welcome back to the blog today. This is the week 13 post for the Altered Puzzle Challenge and the last post. Can you believe it's already the last post of this challenge? Wow! Suggestions on what we should do next?? Let me know int he comments section.

Here are the links to the previous posts for this challenge
Our Facebook group is here:
Facebook Group
This week I'm doing some simple but fun pieces
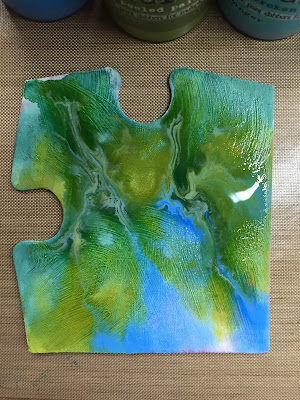
To begin I used Tim Holtz distress paints and spread a few colors on my craft mat... I then spritzed with water and ran my two pieces through the colors


Doing this gives a marbled effect to my backgrounds, it's beautiful, I set those aside to dry completely

Next I took a die cut leaf and my puzzle piece and distressed the edges with some brown archival ink


I stamped the background with a stamp called Seaweed by artist Jo-Capper Sandon and stamped that onto my background.....
I then used a stamp called Reggie by artist Daniel Torrente, stamped and colored him and added him to my background along with my leaf
(both stamps from Stampotique Originals)

I used these little beads called Mini Prills to the bottom of my puzzle piece to imitate sand at the bottom of the sea


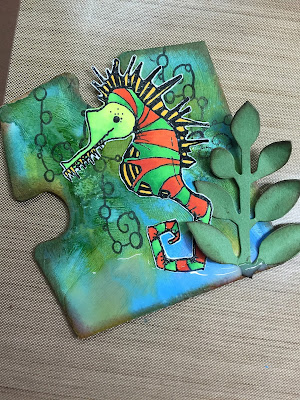

Lastly I went around the edges with my Copper pen

This is my first finished piece, I love those little pills on the bottom, they are so fun

For my next piece I used a couple of stamps from Stampotique as well, these are from the New August release
One is called - Agatha Flower and the other is Agatha's Watering Can both are by artist Magda Polakow
I simply stamped them, colored and cut them out and glued them on (simple)
I used Distress Glitter in the middle of my flower to make it shine, I applied glossy accents as my glue and sprinkled the glitter onto the flower

Here are both pieces together

and here is the final completed puzzle

and close ups of each side


I have a secret to share with you, remember this piece from week 10? It was a piece that I had done complete as one piece
Well if you look at it closely, I accidentally created the piece upside down. The edge is on the left here and it should be on the right.... Want to know how I fixed it?

My friend Terri Richardson and I brainstormed and she came up with the idea to separate the cardboard top from the bottom
I used my Xacto knife and did just that... you can see here that I flipped the cardboard bottom around


I ended up decorated potions of the cardboard piece, like the rounded potion on the left, to match my top
Here you can see the top and bottom together after I colored the bottom cardboard piece

Next I glued the top piece to the bottom cardboard piece and cut around the edges to make it look like a piece that was always correct.
In the following photo if you look closely you can see how I had to make adjustments and cut the pieces. The edge is now on the left side of the piece, like it should be

So the piece went from this (upside-down)
 To this

Here is the corrected piece in my puzzle

This week I'm doing some simple but fun pieces
To begin I used Tim Holtz distress paints and spread a few colors on my craft mat... I then spritzed with water and ran my two pieces through the colors


Doing this gives a marbled effect to my backgrounds, it's beautiful, I set those aside to dry completely


Next I took a die cut leaf and my puzzle piece and distressed the edges with some brown archival ink


I stamped the background with a stamp called Seaweed by artist Jo-Capper Sandon and stamped that onto my background.....
I then used a stamp called Reggie by artist Daniel Torrente, stamped and colored him and added him to my background along with my leaf
(both stamps from Stampotique Originals)

I used these little beads called Mini Prills to the bottom of my puzzle piece to imitate sand at the bottom of the sea

I used glossy accents as a glue for this and applied it to the bottom of my piece


I then dropped the "Prills" on top of the glue

Lastly I went around the edges with my Copper pen

This is my first finished piece, I love those little pills on the bottom, they are so fun

For my next piece I used a couple of stamps from Stampotique as well, these are from the New August release
One is called - Agatha Flower and the other is Agatha's Watering Can both are by artist Magda Polakow
I simply stamped them, colored and cut them out and glued them on (simple)
I used Distress Glitter in the middle of my flower to make it shine, I applied glossy accents as my glue and sprinkled the glitter onto the flower

Here are both pieces together

and here is the final completed puzzle

and close ups of each side


I have a secret to share with you, remember this piece from week 10? It was a piece that I had done complete as one piece
Well if you look at it closely, I accidentally created the piece upside down. The edge is on the left here and it should be on the right.... Want to know how I fixed it?

My friend Terri Richardson and I brainstormed and she came up with the idea to separate the cardboard top from the bottom
I used my Xacto knife and did just that... you can see here that I flipped the cardboard bottom around

Here I put the top decorated piece over the cardboard piece to see what I need to do to fix it and make the two pieces look right

Here you can see the top and bottom together after I colored the bottom cardboard piece

Next I glued the top piece to the bottom cardboard piece and cut around the edges to make it look like a piece that was always correct.
In the following photo if you look closely you can see how I had to make adjustments and cut the pieces. The edge is now on the left side of the piece, like it should be

So the piece went from this (upside-down)


Here is the corrected piece in my puzzle

Pretty cool right? Thanks to my friend Terri for the suggestion!!
Thanks everyone so much for joining me in this challenge, I really hope you had as much fun as I have with this.
I'm so excited about my finished puzzle, I just love it!!
I cannot wait to see your final puzzles.
CHEERS!!!!


