Pages

Showing posts with label idea-ology. Show all posts

Wednesday, December 23, 2015

One Last Christmas Display

Hello all and welcome back to the blog today. I have one more Christmas display to show you prior to Christmas. Cutting it close on this one haha! 
I have recently gotten my hands on the new Tim Holtz Paper Mosaic Kit from my work Simple Pleasures and I couldn't wait to break it open and play with it. 
Ever since I saw Tim's video on youtube with this kit, I've been wanting to check it out


To begin this project I took a piece out of Tim's configuration book, I'm going to create a scene inside this. 

I started out by using the Distress grout onto the entire backside of the box, I used a pallet knife to spread my grout. I probably should have made it a bit smoother but since this was my first time, it was a learning process
(for some reason my photo wouldn't stay upright for this post, sorry about that.)


I sat that aside to dry thoroughly

While that was drying I started with some things for the scene I was going to create.
I used Tim's Trophy Antlers and applied some multi matte medium all over them and sprinkled glitter onto them
Also, setting that aside to dry

I then cut a piece of Tim's older Christmas paper and used distress ink to the edges and top. I used the paper distress tool to distress my edges as well


I wanted to add a poinsettia to this so I created a small one using Tim's movers and shapers poinsettia die. I simply cut these out with red and green paper that i previously stamped music onto, I then used distress ink on the edges


I wanted to use glitter and prills for the center and I applied these with glossy accents glue


I love how the center looks so real with the prills and glitter

Once my "grout" was completely dry, I began by placing some of my mosaic pieces here and there onto the back of my box.
(I previously cut the pieces out using Tim's Christmas paper)


Once I figured out how I wanted my pieces to lay out, I started gluing them down with the paper mosaic glue
when they were all placed and glue down I applied one more coat of glue to the entire back


I set this aside to dry

When all of the glue had dried completely I went ahead and applied my paper mosaic glaze over each mosaic tile. Again, I set this aside to dry


I forgot to mention that prior to applying my mosaic pieces I used distress ink to go over the entire background of my box
It's really kind of cool how the distress ink blends into the background as your applying your glue and mosaic pieces


I used one of Tim's script thinlet word dies to create my "joyful" word and I also used one of his woodland tree miniatures (sprayed with distress spray)
For the silver tinsel around the edge, I simply hot glued that


This is how the back and sides turned out, I love it!


Thanks so much for coming by and checking out this fin and festive display. I hope you and yours have a Blessed Christmas!! 
CHEERS!!!


Monday, June 15, 2015

Altered Puzzle Challenge Week 8

Hello and welcome back to another week of the Altered Puzzle Challenge. 

For those of you who had the same size puzzle as I did we are going to be starting row 3 of our puzzles this week and pieces 13 and 14


Here are the links to the previous posts for this challenge


Our Facebook group is here:


For my first piece this week, I am going to take metal tape (bought at the hardware store in the plumbing section) and I am going to emboss two strips of it with an embossing folder.
Why two strips? Because in order to cover the entire puzzle piece I need two pieces of the tape


Once embossed, I used distress paint in two colors over the metal tape, I set that aside to dry completely


Once dry, I used my mini sanding tool to go over the top in order to scrape some of the paint off, giving the tape a distressed look

I then used ink and went over the top as well, giving it even more of a distressed look


I then taped the pieces to my puzzle piece and trimmed the edges


I then grabbed some corrugated cardboard and tore a piece to use


I used two colors of ink to distress it a bit


I then added my cardboard and trimmed


I then punched a hole in one end of my piece and added this Tim Holtz hitch fastener


Next I used some more of Tim Holtz ideology products and added a color of distress paint 


I am going to hang the "dream" from the hitch

Here is my finished first puzzle piece


For my next piece I went really simple and added some color with DecoArt spray media misters


Next I stamped the swirl with a stamp and simply wrote my sentiment. First I wrote it with black and didn't like it so I wrote it over with my white gel pen


Here is my finished 2nd piece


and here are my pieces together 


and here are my pieces together with my puzzle


Have fun this week, I hope you enjoy the pieces. 
CHEERS!!!

Monday, May 18, 2015

Altered Puzzle Week 4

Welcome back to the blog today, I'm actually posting the challenge this week on time haha!! 
We are onto week 4 of the Altered Puzzle Challenge 


Here are the links to the previous posts for this challenge


Our Facebook group is here:


This week, since we aren't worried about the pieces being flat, I decided to do some embossing and add some embellishments.

I started out with my first piece, painting the background a light brick sort of color


I then used embossing ink and two kinds of powder, I just dabbed the pad directly onto my puzzle piece here and there and added the powder and heat set


Once I was finished I wanted more so I added more....


This was how it was when I finished


I wanted to add a bird of some sort so I used a Dyluisions set and stamped my bird onto some patterned paper
I used clear embossing ink for the bird and cut him out


I added some ink and stenciling to the background
(guess I should have done that before the embossing, o-well)


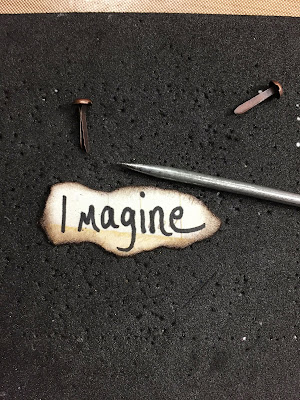
Next I wrote the word Imagine onto the same paper that I stamped the bird and tore it out and inked the edges with brown archival ink


I then punched a hole in each side of the word so that I could add brads


I adhered everything to my background and whalla!! I love the way this piece came out


For my next piece I used DecoArt media paint in a burgundy color


The color was a little bright for what I wanted so I added a bit of a darker color


After that has dried I used a stencil and black embossing paste to add some texture


I really love how that texture came out


I set that aside to dry

for the next step I glued some Tim Holtz paper onto cardboard
and used a butterfly mover and shaper die to cut out


I edged my butterfly with a black marker and I want my wings to stand up so I bent the butterfly right down the center a tad


Next, I grabbed some Tim Holtz ideology flowers and put them together with a brad
I'm going to use this in one corner of my piece


I stamped my sentiment onto that patterned paper and embossed and tore out


I also edged with brown Archival ink


I also wanted to use some pearls on my piece but I didn't want white pearls and that is the only color that I have at the moment. This is a perfect trick - Use your copic markers to color the pearls whatever color you want!!! 


After my background was dry I added everything, I only applied glue to the middle of my butterfly here so that the wings can stand up


and here is my finished puzzle piece


and the two together


I hope that you like the two pieces for this week, they are different but so fun!
This is what your first row should look like now... next week we start on the second row.


Have a great week everyone, see you next Monday!!