Pages

Showing posts with label Stencil. Show all posts

Wednesday, May 25, 2016

Stampotique Challenge 246 - Anything But Black

Welcome back to another week and another new challenge over at Stampotique. This week Samantha Reed is our hostess and she is challenging us to a "Anything BUT Black" challenge.
Here is what she says about this challenge:
"The first thing I usually do after choosing which stamp I'm going to use is to reach for my black inkpad. So I'm challenging myself and you to make anything you fancy so long as there is no black ink or paint etc. Have fun!"

So let's see your best "non-black" creations. No black what-so-ever is going to be quite a challenge for me, I use black on everything I create, I think black is my most used color.

This week I created a dashboard cover for my Midori travelers notebook. This one is going to be the cover for my calendar insert

To begin I covered the entire page with gesso
I then used my DecoArt paint to paint the entire background an orange color
After that was dry I combined some DecoArt turquoise paint and this awesome stuff called Texture Powder (by Prima)
The powder essentially makes any paint into a texture paste when combined. It's the coolest stuff. I used the paste through a stencil onto my background


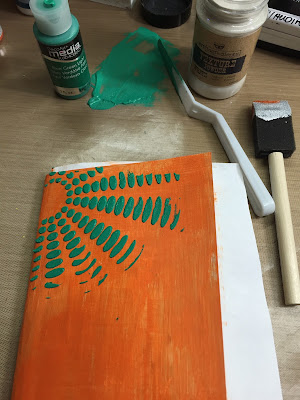
I then used my finger to apply some more of the paste here and there

So this part is actually funny, I stamped my image and then embossed it and realized that, out of habit, I stamped with black ink!! I had to go and re-stamp the image with a brown ink instead. LOL see how much I use black ink?
The bottom image was my black one LOL..

I then colored my brown embossed image with the copic markers and cut her out


After decorating my background, stamping, painting some more, inking and using some dies, it was finished. I love it!! and no black whatsoever! Those streaks on the bottom, sides and top are a dark brown, no black, I promise. :)

 For this project I used Stampotique stamps:
Ruff and Kate's Doodle Cube - By Artist Kate Crane
Comfort Zone  - by artist France Papillon


This was a super fun challenge, I really hope you will join us this week at the Stampotique Challenge Blog  and thanks for stopping by. Have a wonderful week!

For more inspiration see us on
and


Monday, June 1, 2015

Altered Puzzle Challenge Week 6

Welcome back to the blog everyone, thanks again for coming by. If your following along with the Altered Puzzle Challenge,
we are onto week 6


Here are the links to the previous posts for this challenge


Our Facebook group is here:


We are creating pieces 9 and 10 and
I started with my first piece but adding Dylusions paint to my background. First yellow....


Then some orange  (I added all these colors with a sponge on my finger)


I added red with the side of my credit card by just scraping it downward


Next I added turquoise with a Tim Holtz stencil


and lastly I added a bit of hand writing with my Zig pen
I wrote a quote that my husband just had engraved onto my wedding ring.
"Place me like a seal over your heart" 
Song of Solomon 8:6


Next I added a tad bit of white paint here and there with my brush


Now that I have my background done, I am going to cover up most of it... LOL..
I die cut this heart  and added a bit of double sided removable sticky tape and stuck it into the middle of my puzzle piece


I then used black paint to smudge along the edges


Once I removed the die cut heart, you can see the bright colored background
I then added white paint around my edges


I used my pen again to write the word "Love" and then cut it out
I also used a baby wipe to wipe some of the white paint off around the edges
Here is my first finished puzzle piece


For the second piece I used some Tim Holtz paper and glued a piece to my background and cut it out


Next I used wash tape and added some to a piece of card stock and cut it into a stem
This is going to act as the stem for a flower I'm going to create


To create the flower, I decided to use Wendy Vecchi clearly for art in pitch black
I am also using Ranger's alcohol inks in Metallic silver and gold
 I cut my clearly for art using Tim Holtz movers and shapers tattered flowers die


Simply use a distress tool to apply the alcohol ink onto the clearly for art flowers


Next, heat up the clearly for art and shape it as much as you want. I ended up only using one of the flowers that I cut out
I found a video where Wendy shows how to make a similar flower HERE

I added a Tim Holtz mini gear to the center of my flower and figured out where I wanted this flower to go onto my background. Using E6000 glue I adhered to my background


I added my sentiment and trimmed the stem on the bottom of my flower and last I used my copper pen to edge the piece


Here is my finished 2nd piece


and here are my two pieces together


and the puzzle together


So far so good? I hope you have fun creating your pieces this week. 

Thursday, May 14, 2015

Altered Puzzle Week 3

So sorry for the delay in this week's Altered Puzzle Challenge. I became a Grandma last week and was back and forth to the hospital all week visiting my daughter in law, my daughter and my new grandchild.
Meet my new grandbaby Sagen Lanay


My daughter, grandbaby and me :)


I also picked up a few extra hours at work this week, so it has been a busy, busy couple of weeks, sorry for the delay.

We are onto week 3 of the Altered Puzzle Challenge 


Here are the links to the previous posts for this challenge


Check out the previous week's if you are just beginning.

Our Facebook group is here:

this week I want to use some images that my artsy friend drew and sent to me. She is amazing!! 

For my first background I used some of Tim Holtz tissue paper and applied it to my background, directly over the gesso
I just used glue stick for this


Next I am using Dina Wakley's paint (you can use any paint) and I applied the lighter color over the entire puzzle piece


Next I used a stencil, the darker color of paint and some distress glitter... (make sure your first background color is completely dry before moving on to this step)

What I did is used a sponge and grabbed up some of the paint and using the sponge, dabbed the paint through the stencil onto my background...
Next I removed the stencil and added some of the distress glitter in the same color as my paint 
I love how it came out, there is a little sparkle on my background here

Let this completely dry

While my background was drying I printed out my phrase (a Bible Verse)
and colored the image I wanted to use with some copic markers
I cut out my image and went back to my background

I edged my piece with archival ink in a darker shade of blue and then I sealed it with Alene's collage pauge (they sell this at JoAnn's) you can use whatever you like to seal your piece but Alene's is what I like. 
I sealed it at this point because I want my glitter to stay onto that background and this way it will


Next I added my phrase and image
Here is my first piece:
Again: my friend Terri Richardson drew my little man in the moon.


For my next piece I started by using DecoArt acrylic paint to color my background white
(setting it aside to completely dry)

While that was drying I colored my image with copics again
and then cutting out


Once the background was dry I used black archival ink to edge it


In order to get into those half circles, I took my foam off of my distress tool and folded it, like so:


and lastly I added my flower and my phrase
My phrases this week were printed with my home printer

(again: Terri Richardson drew my flower)

Here are my pieces together


I just love the white background on the second piece, that was a good choice and I don't normally like plain white backgrounds but for this I did.

Here are the pieces from week 2 and week 3


Have fun this week! Can't wait to see what you create!

Wednesday, May 6, 2015

Stampotique Challenge 194 - Stencils

Welcome back to the blog, thank you for stopping by today. This is Wednesday and this means there is a new challenge over at Stampotique Designer's Challenge Blog, this week our hostess is Corrie and her theme is "Use one or more stencils"
Here is what Corrie says about this challenge:

"Hello and happy Wednesday. I love using stencils. They add another layer to your backgrounds and lots of interest too. Use them with paint, ink, model paste or even gesso. Show me what you do with stencils.. Have fun ! Corrie x"

For Corrie's challenge I wanted to do a journal page. I used a few stencils on my background. 

I started out painting my background with a brownish brick color
I then used a brick stencil and some black Wendy Vecchi embossing paste for my background


I then used white paint and another stencil to add some letters to my background
I used a Gelli pen to add the letter "L"


I added some Stampotique images and a saying.. It was so much fun creating this page.
I like how it looks like a brick wall with graffiti 


Stampotique stamps I used are:
Design Cube 2 By France Papillon 
SkiddyFroggie By Daniel Torrente

Come by the Designer's Challenge and join us this week, I mean, who doesn't like stencils? They are so fun!
Have a great day!!