Pages

Showing posts with label butterfly. Show all posts

Thursday, November 13, 2014

Tim Holtz 12 Tags of 2014 - November

I'm doing so good because I've been at home crafting lately. I had been so behind in all the challenges I love and also 

Since I've had my foot surgery I've been stuck at home, which is a good thing because I'm catching up on all things crafty! 
I had long loved Tim's 12 Tags and I've always done all of them. I have missed a few this year due to other obligations but I vow to catch up on those I've missed. I was able to sit down and do November's tag. I was in AWE when I saw his tag this month, it's just beautiful! Tim is always so creative!

I didn't have all the wonderful supplies that Tim used but I did improvise on those items. 
As you all know, I am doing postcards instead of tags this year. I always make two, one for me and one for a friend

I started out by choosing my Distress Paint colors for my backgrounds and followed Tim's directions for applying them


I used the Layered Butterfly Die and embossing folder instead of the leaf one that Tim used.... I didn't have the stencil Tim used so I used the Burlap one


I also did not have the foil so I used Zing embossing glitter


Again, I didn't have any Distress Spray Stains (next on my shopping list) so I used my Adirondack Sprays


To add the gold I used Distress Paint and splashed and painted it on with a paintbrush


I didn't even realize how many substitutions I had to use until I started this post but hey, that is what the tags are all about, doing your own thing with Tim's tutorial. 

Here is my finished Postcards:


I am really loving how they came out, the colors are beautiful and I love the cardboard!! 
Make sure to check out Tim's Tag for November, it's just stunning!

Sunday, April 7, 2013

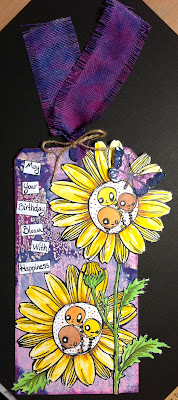
A Different Kind of Birthday Card & Painting with Tim Holtz Distress Paint


If you follow my blog you know that I made some gelli prints yesterday (I literally got lost in my room with them) For today, I wanted to make something with one of my prints and also enter my creation into three challenges for this week, they are:

Simon Says Challenge - They are celebrating their 4th Birthday this week, way to go!!
Stampotique SDC94 - Their challenge this week is "Flowers", woot!
613 Avenue Create - Their challenge is "Spring Fever", YAY!

With all that in mind I chose one of these Ranger Jumbo tags to work with, the one on the left. 
If you want to see how these tags were made with Distress Paints and my Gelli Plate you can go HERE to find out how I did them.


Since this gelli plate print was made with Tim Holtz new distress paints I decided to do my entire tag in Distress Paint. 
I started by stamping this huge flower and stem (from Steampendous) with black Adirondak ink, I wanted to make sure if I paint these the ink would not run. 
I decided to use my 3 In a Round stamp from Stampotique by Daniel Torrent and Jill Penney for the center of my flowers so I stamped those on the same paper in black also.


I used all these colors of Distress Paints for this project.

For the base of my tag I used Spun Sugar and a stencil that was the same shape as my flower to go around and build a sort of "mask".. (this Stampendous set comes with the mask and the stencil for this flower)


I dabbed some of my paint onto my craft sheet and used a paint brush to paint everything. For the Flower, I brushed from the center of the flower out in a stroke kind of motion. This gave the flower a little depth. I DID NOT use water with my paint. I wanted as vivid of color as possible so I only used the paint without spritzing with water.


I did the same thing with the center of the flower here. You wont see all if this center once the guys are in place but you can see what I did here. 
I then fussy cut my flower out. I also painted my 3 In A Round guys with the paints in various colors and with them I used my paints and water mixture. I wanted my guys to be less vivid and ore opaque so I added water to my paint and used a paintbrush to paint them. I also added small dots around them to act as the center of the flower.

I painted the stem and this time I used mowed lawn first (with water added) and then went over the stems vein lines with Peeled Paint (without water added) in order for the stem to be more life-like.

Adding the Peeled Paint gave the stem more life and depth

I also used this moth from a Michael's stamp set and painted it as well. I used Seedless Preserves (with water) and Chipped Sapphire (without Water) it's tough to tell the difference but the Sapphire is a little darker in tone than the Seedless Preserves. I also added Glossy accents to the Sapphire parts of the wings (not pictured)


I wanted a ribbon for the top of my tag and I really wanted it to match so I used some fabric ribbon and the Distress Paint.(again in the colors Seedless Preserves and Chipped Sapphire)
I just dabbed some of both colors onto my craft sheet and spritzed with water and ran my ribbon through it. Heat set it and BOOM, I've got a great ribbon to match my tag.


Once everything was colored, I basically fussy cut everything out and adhered it all to the tag with glue.
I wrote the words onto white cardstock and edged them with black marker.


This was a fun tag to make, it's big and it's bold and along with those fun Stampotique characters it makes for a great Birthday card. It's a card but not a card haha!
Thanks for stopping by and I hope you have enjoyed the tutorial, it's so simple to paint with the distress paints and there are so many ways to use them, the possibilities are endless.

If you haven't already entered my give-a-way make sure to check it out HERE and enter. The Deadline to enter is April 14th.


Sunday, March 24, 2013

Dare To Dream Pocket Watch


For my project today I am going to be using the Tim Holtz Pocket Watch Die. I got this the other day from The Funky Junkie Botique and I was just itching to use it. I could not wait!!
I am going to enter this project into the Sunday Share over at Filly and Funkie. 

Also: Over at Hels Sheridan's Blog she is challenging us this week to do something Shiny and use a stamp and I have done both here so I might just link this up for her to see.

I will also be adding this one to Inspiration Journal - their challenge is to add a little POP to your creation. This is a new challenge blog for me (a suggestion from a follower) they give a random winner a 50.00 voucher YAY!

I wanted to make something that would go on top of my daughter's Bday card and also be something she could display in her room. Alot of times I start with an idea and it becomes something totally different as I go through the process. I started off by cutting about 4 of the pocket watches out of card stock. The last one that I cut I left the circle inside, this will be my base piece.
I used this really cool thick metallic embossing powder (almost like UTEE) to cover the base.


I then took a couple of stamps from Tim's stamp sets Mini Blueprints 3 and the clock from a Visual Artistry set I bought at Michael's and heated up the embossing powder and stamped these into the base. I LOVE how the background came out using these two stamps.


I also heat embossed the "top" portion of my pocket watch and the insert piece.

I took distress inks in Walnut Stain and Black Soot and went over all three pieces of my watch to give it a more aged look and dull it down a bit.


After that was done I created a butterfly out of one of Tim's movers and shapers and some grunge board. I used two different embossing powder colors and another one of Tim's stamp sets called Warehouse District. I again stamped the stamp into the embossing powder while it was heated in order to make an impression.


Love the way the butterfly looks industrial here. 


I took the "Dare To Dream" stamp from the Simple Sayings set and used it to stamp onto this piece of paper I had laying around. I also used Ranger's black fine embossing powder.


I layed everything out onto my craft sheet and figured out exactly how I wanted it to look before adhering it all with my heat gun. I used some idea-ology gears and I had this really cool piece of watch insides that I used as well. 

Once everything was in place I used Glossy accents to glue the other layers on top of each other. I took about 4 inner layers to cover the entire butterfly.


I also used glossy accents to glue a piece of packaging plastic to the top piece of the watch so it looked like a real watch and you can see through it. 
(sorry the pic was dark)

Once that was all done I used the same embossing powders and Tim's Tattered Flower Garland Die Strip to create these flowers for the outside of my watch. I also created a pin with some beads that matched the piece.


Lastly I painted the entire outside with Claudine Hellmuth's black gesso.


It's a lot of steps but it really comes together quickly and is so fun to do. I think I'm going to keep this one for myself and make a thinner one for my daughter's card. 


Happy Palm Sunday everyone, I hope you have enjoyed my tutorial.