Pages

Showing posts with label washi tape. Show all posts

Tuesday, September 13, 2016

Homemade Coasters with Stampotique

Hello everyone, thanks for stopping by today. I wanted to show you some coasters that I made for my daughter and sister featuring Stampotique stamps and some Dylusions sayings.
I also want to invite you to come over to the Stampotique Designer's Challenge Blog and join us this week in our challenge. We always have some great prizes.

this project took me all of about two days to finish. I made two sets of 6 coasters for a total of 12. I created my backgrounds, two by two, all the same so that I could make two sets of coasters pretty quickly.


For the backgrounds I used mostly acrylic paint (since it's permanent and won't smear when I get ready to seal them)
If I used inks it was mostly Archival that I used. Distress or anything else would smear. I love to add washi tape and doodles into my backgrounds as well.
Most of my stamped images were stamped onto thinner cardstock and colored and then fussy cut out. (that what takes the longest in this process) 
The first set were made for my sister. She is a fun and sarcastic person so I used some of the Dylusion's stamped sayings on them.
The second set were made for my daughter and I used mostly Stampotique's sayings
Even though the backgrounds are the same, the coasters came out very different. 
This was so much fun and I loved making them. Time to buy some more blank coasters and make more!!!
(At the bottom of this email I will list with links, the Stampotique stamps I used.)


Don't forget about Stampotique's New ATC  swap on our Facebook page, there 
is tons of inspiration there and also on

Stampotique Images:

Starfish CubeDog CubeReggieRudylovelyarethesoundFriendBla Bla Bla = all by Daniel Torrente

WillowCasper = By Tracy Scott

Phrase Cube - By Terri Richardson

Sealife CubeAnimal CubeAgatha FlowerIgnis - By Magda Polakow

Wally - By Karen Hayselden

Design Cube 2 - By France Papillon

Friday, September 18, 2015

More Fun with My Filofax - Making your own Dividers and Calendar

Welcome back to the blog, today I want to talk about my filofax. I recently bought a new one from my Local Store (Simple Pleasures Rubber Stamps and Scrapbooking) where I work. My boss got in some Personal Maldens and Oh my word! I fell in love with them. They are so soft and fabulous.
At any rate I had to purchase the purple one


I previously had an A5 that I was using, you can see the size difference here:


These are some of the pages I preciously made for my larger A5 - I blogged about that here:


I had set up my A5 to be my all around planner BUT I really like the size of the Malden because it fits nicely into my purse. What I decided to do was switch from my A5 to my Malden and use my A5 as my "Design Team" planner at home and Keeping track of everything I do with the Stampotique Design Team
It's not easy to make the switch and it took me a few days, here is what I started with..

I made some section dividers, these were made with Bella Blvd Patterned Acrylic, it's perfect to cut down to size and use for dividers and there are so many fun patterns to choose from


I also cut a sheet of the same acrylic to use for washi tape, I wrapped my tape around the sheet and it's perfect because the washi just comes right off of it and doesn't stick, so I can use it in my planner


I also used Tim Holtz pocket sleeves to create some pockets for my filofax. These are great because they are thin but sturdy. They are not created specifically for the filofax so I had to create my own holes. I first added colorful washi tape to my edge, preparing them for the new holes
I used my crop a dile and a template to punch the perfect holes
These sleeves are great for holding washi tape paper, business cards, photos and so much more


This is a photo of my washi tape holder and my Tim Holtz pocket page together. You can see that I used the Tim Holtz pocket for my colored tape

This is my front page, as you can see I have my credit cards and business frequent shopper cards here, I also created a bookmark with my Bella Blvd Acrylic.


Lastly I created a Work Schedule monthly page so that I can easily look here to see what days I work and what days I am off work
For this I started with a sheet of paper that was exactly the size I needed for my planner, I wanted a full month on one page and the planner is small so I simply created it.
I then traced this same calendar onto a 81/2x11 sheet of printer paper. Once that was done I wrote the days. This way I can make copies whenever I need to and I don't have to do this step again

I then used photo corners on top of my divider in order to insert my calendar onto the page, this makes it easy to take it out each month and replace it again with a new month and schedule. I love it!

Here is a close up of the photo corners

(yes we have Marjie Kemper coming to teach at the store, I wrote that in pink, it's special haha!)

So my final insert looks like this:


Well hopefully this gives you some ideas on how to make some of these things for yourself instead of buying them. I always love the idea of making things I need, it just makes it more special and personal. I know switching over to a new planner isn't easy and it's a process but these tips might help you make it easier.

We have all of the supplies used in the post in the store
Simple Pleasures Rubber Stamps and Scrapbooking
719-528-1338

Thanks for stopping by!!

Sunday, September 6, 2015

Bible Journaling - My New Passion

Hello and welcome back to the blog today. I wanted to introduce you to my newest favorite past time. Bible Journaling. 


We recently had Stephanie Ackerman come to our local scrapbook store and I took her Bible Lettering and Journaling class and I fell for it full force. Ever since I had been searching for a Journaling Bible because the margins in my current Bible are just too skinny to journal. 
I took a trip to Mardel where I found a few, in two different sizes and they were on sale! Yay! It's not my favorite translation (ESV) but I like that the margins are nice and big.

Since then I have done several pages and I wanted to share those with you today

Stephanie had stamped these and put them into our kits and I went ahead and colored it and added this to the very cover of my Bible with some wash tape, I have a bracelet that says this and I just love the message here


My pages are deeply personal but I want to share with you my journey 
This page was my very first one in this Bible and was done with one of Stephanies print outs, I simply traced it onto my page and then made it my own, I drew the flowers at the bottom
I have been using Neocolors and a water brush for almost all of my pages
Psalms 46:10

Next I did this page and free handed the lettering. I need some more practice but it's a journey, right?
Hebrew 11:6

Hebrews 11:39-40

Hebrews 11:1

for the next two pages I traced one of my wonderful friends flower and butterflies. She is an amazing artist (Terri Richardson)
Romans 12:2 


Proverbs 3:5

I was highly frustrated the day I did this page and I prayed and asked the Lord for peace on my heart.
John 16:33


This page evolved as I went along, I never knew I could draw an eye haha! 
Ephesians 1:18


For this page I added a stamped sentiment by Stephanie and Unity Stamps and taped it into the page with washi tape
I wrote behind it about my anxiety
Pilippians 4: 4-7


This is also a drawing by my wonderful friend Terri - I did the lettering
Mathew 9:29


This is the verse that is engraved inside my wedding ring, it means a lot to me and my husband
Song of Solomon 8:6


Psalms 18: 1-3


That's it for me today, I'm sure you will see even more Bible journaling from me here on the blog since it's my new passion.
Thanks for stopping by and have a wonderful Sunday and a great Labor Day tomorrow
CHEERS!!

Friday, August 28, 2015

My Filofax Tabs

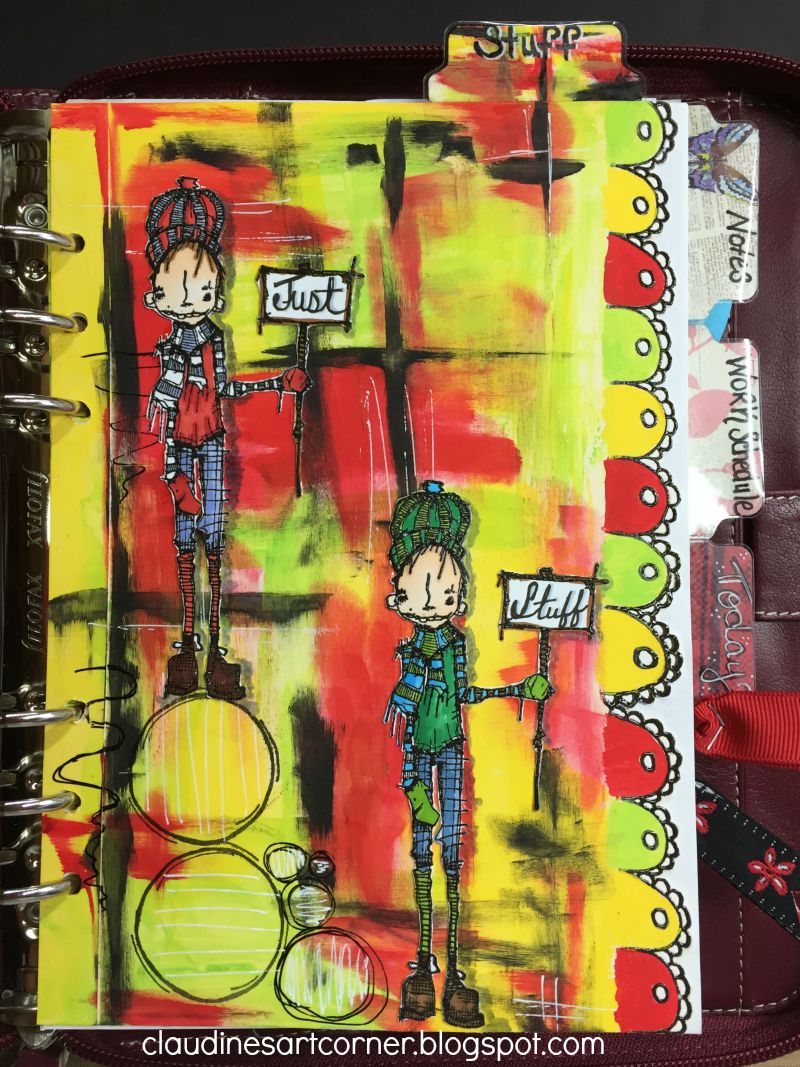
Hello and welcome to the blog. Today I'd like to talk about my newest obsession, my Filofax. I am loving this organizer and am having so much fun making tabs for it and figuring out how I want to organize it. 

The store where I work,  Simple Pleasures Rubber Stamps and Scrapbooking starting carrying these this month and as soon as I got one I was hooked. My boss Cathy will ship these (or any products) so if you want to buy one make sure to call the store and see what we have in stock. 719-528-1338

Here are some of the tabs I've made for my Filofax
This was the first tab that I made, I used Memorybox stencils and Archival ink. I also used butterfly wash tape around the edges, this one came out simple but I love it
I used a Memory Keeper Punch to make the tabs in the side, labeled "Notes" this is a perfect punch for making tabs, the punch even comes with clear plastic tab covers, its awesome! We also sell the tab punch, stencils and inks at the store


For my next insert I used my round gel plate and Dina Wakley paints to create this fun page. I used several different stencils for the numbers and texture in the background. (this is my budget tab)


For my next insert, I used a combo of acrylic paints and Dina Wakley paints. My stamped images are from Stampotique Originals and I used Copic markers to color them. This is my opening page for my filofax


As you can see I love color, this insert is no exception. I used Tim Holtz Crazy Bird stamp set along with the die set (makes it easier to cut out these cool birds) and colored my images with Copic markers. For my background I used Dina Wakley Paints again and I added some washi tape and doodling. The tab for this page says "Store Cards" I will keep all those darn store cards behind this tab.


Last but not least, I created this insert with Wendy Vecchi crackle texture paste in white and also her regular texture paste, I used the paste through a bunch of different stencils.
Next I added Tim Holtz distress inks in several colors
you can see what colors I used in the photo below
you can also see that I added a tag at the top of this page


I added black cardstock letters cut out with Tim Holtz Word Play Sizzix Die

This tab is going to be my Budget Tab, I switched this one and the gelli plate one from above. That tab was changed to "lists"


So those are my tabs so far, I plan to hopefully make a few more but I think I'm well on my way to having my filofax organized the way I like it. 
All of the products in this post you can get at the store Simple Pleasures Rubber Stamps and Scrapbooking
and this is our Facebook page where you can see more photos of Filofax ideas. 

Take care and thanks for stopping by today


Monday, July 27, 2015

Altered Puzzles Week 12 - Back from Vacation

Welcome back everyone, I am home from a 15 day vacation and am pumped to get going on this challenge once again.
My family and I took  much needed vacation to California and we had a great time while we were there.


Now that I'm back let's get started on the next two pieces. 


Here are the links to the previous posts for this challenge


Our Facebook group is here:
Facebook Group

I am doing these two pieces completely different, fir the first piece I took a doily and placed it over my piece


Next I used my archival ink and a sponge tool to add blue


This is how it turned out, I love it!


I then added a bit of white with a paintbrush and white acrylic paint. I didn't use my white gel pen here because the gel pen doesn't work well over the gesso and ink

I also added a bit of torn wash tape


I used a Wendy Vecchi flower stamp to stamp some flowers and also colored them in with Copic Markers. I then cut them out


I also stamped my words onto scratch cardstock and cut them out. 


Here is my first piece, I used glue dots to adhere my flowers and rolled up the petals to give it a dimensional look


For the second piece I started with some distress ink for the background, I applied the mini ink directly onto the background


I then used a brown color for the edges, this time I applied with a ink blender tool


Next I spritzed water onto my fingers and dripped it onto my background


I then used archival ink and stamped a scroll word stamp onto the background
Check out that background too, after I used the water it came out so cool!!


I then used a Stamping Up stamp to add some flowers to the bottom


For my center piece, I stamped some grapes onto cardstock and heat embossed, I then colored them with copic markers
I then cut them out


I applied my sentiment and my grapes to the background using dimensionals


Here is my finished second piece


and here are my pieces together


and my entire puzzle


Check back next week for the final two pieces!! Have fun with your pieces this week and cya soon
CHEERS!!