Pages

Showing posts with label Paint. Show all posts

Tuesday, July 7, 2015

Roc Nicholas Design Team

Hello all and welcome back to the blog. Today is the 7th of the month and that means it's my turn to make something for the Roc Nicholas Design Team
Make sure to check out all of Roc's stamps over at the online Stampotique Store
They are so fun to use, I just love them

For today's post I decided to do a journal spread. I used my Dylusions larger journal today so I'd have plenty of space for all of my stamps
This page started out as just a mess of paint and crackle paste and all kind of things. LOL


You can see the white crackle paste better here, I love it!


I used all of Roc's sentiment stamps that I have in my possession for this. (except one) I simply stamped them onto paper and added them to my background


I can't tell you how much I just love this page now that it's done. The colors are bold and all the stamps really give the page life. 
I hope you have a wonderful day!!! 

Saturday, June 20, 2015

Scrap Journal Page

Hello all and welcome back to the blog. It's been awhile since I did some journaling just for me and not for something specific. I sat down at my craft table and opened my journal
with intentions to do a page but my mind went blank. 
I couldn't think of what I wanted the page to be about and I was looking around my table for inspiration and I had that "lightbulb" moment. LOL... has that ever happened to you?
I had so many papers and scraps and other doo-dads on my table and I thought, "why not make a page with only items that were currently on my craft table?"
I encourage you to do this, specially if your a crafter and don't clean up your table often enough haha! 
If you decide to do this please leave me link to your photo or blog post so I can see what you have done as well


While creating this page, it kind of took on a life of it's own. There are torn papers, pieces of leftover wash tape, stamps, stencils and the flower at the bottom of the page was a mask that I used on a Stampotique challenge a few weeks back. It has been stamped on several times with black ink
The butterfly was already stamped, colored and cut out and I didn't use it previously so it sat there for months on my desktop, same with the crow.


The quote on the tag I had printed that out a few months back and intended to use it on a project and then never did LOL...


I love the way my page came out, this was so much fun. I will have to do it again in a few months and see what I come up with.
I hope that you will try this at some point, it's really fun to challenge yourself to create something with only the leftovers on your desk. Have fun and thanks for stopping by.
CHEERS!!

Thursday, May 14, 2015

Altered Puzzle Week 3

So sorry for the delay in this week's Altered Puzzle Challenge. I became a Grandma last week and was back and forth to the hospital all week visiting my daughter in law, my daughter and my new grandchild.
Meet my new grandbaby Sagen Lanay


My daughter, grandbaby and me :)


I also picked up a few extra hours at work this week, so it has been a busy, busy couple of weeks, sorry for the delay.

We are onto week 3 of the Altered Puzzle Challenge 


Here are the links to the previous posts for this challenge


Check out the previous week's if you are just beginning.

Our Facebook group is here:

this week I want to use some images that my artsy friend drew and sent to me. She is amazing!! 

For my first background I used some of Tim Holtz tissue paper and applied it to my background, directly over the gesso
I just used glue stick for this


Next I am using Dina Wakley's paint (you can use any paint) and I applied the lighter color over the entire puzzle piece


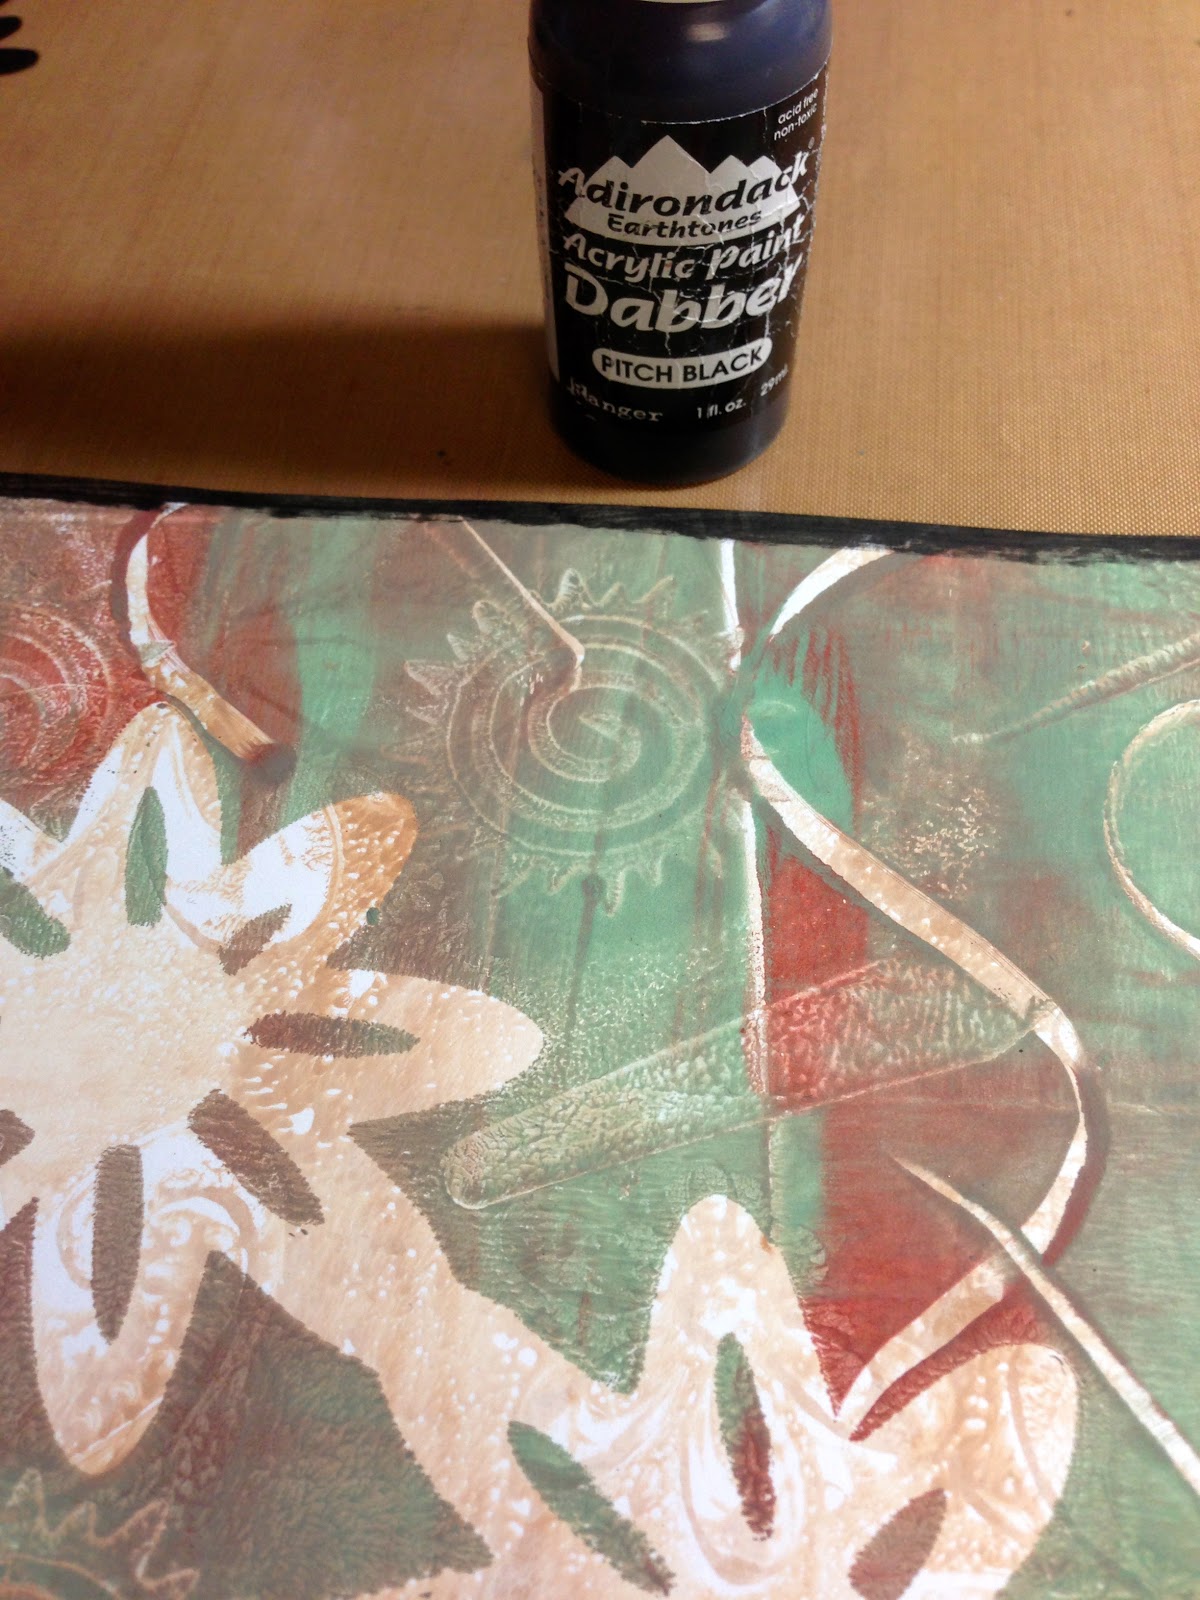
Next I used a stencil, the darker color of paint and some distress glitter... (make sure your first background color is completely dry before moving on to this step)

What I did is used a sponge and grabbed up some of the paint and using the sponge, dabbed the paint through the stencil onto my background...
Next I removed the stencil and added some of the distress glitter in the same color as my paint 
I love how it came out, there is a little sparkle on my background here

Let this completely dry

While my background was drying I printed out my phrase (a Bible Verse)
and colored the image I wanted to use with some copic markers
I cut out my image and went back to my background

I edged my piece with archival ink in a darker shade of blue and then I sealed it with Alene's collage pauge (they sell this at JoAnn's) you can use whatever you like to seal your piece but Alene's is what I like. 
I sealed it at this point because I want my glitter to stay onto that background and this way it will


Next I added my phrase and image
Here is my first piece:
Again: my friend Terri Richardson drew my little man in the moon.


For my next piece I started by using DecoArt acrylic paint to color my background white
(setting it aside to completely dry)

While that was drying I colored my image with copics again
and then cutting out


Once the background was dry I used black archival ink to edge it


In order to get into those half circles, I took my foam off of my distress tool and folded it, like so:


and lastly I added my flower and my phrase
My phrases this week were printed with my home printer

(again: Terri Richardson drew my flower)

Here are my pieces together


I just love the white background on the second piece, that was a good choice and I don't normally like plain white backgrounds but for this I did.

Here are the pieces from week 2 and week 3


Have fun this week! Can't wait to see what you create!

Friday, July 5, 2013

Unruly Reader Art Quest for July

Hey Bloggers, this month over at Unruly Paper Arts the Reader Art Quest theme is all based around postcards. 
We would love to have you come by and take part in these fun themes. These themes will run through July 25th and then voting will begin. 

RAQ #1 - Is all about Over the Edge Postcards. We want you to share you Edgy and Artful 4x6 masterpieces. 

RAQ #2 - This one is all about Vacation themed 4x6 postcards

You can click the two links above to check out the Columnists creations for some great ideas.

Join in one or both!! All are welcome.

My creation for this months theme was made with some Gelli Plate prints that I had done. 

I used the gelli plate to create the two background for the back and front of my postcard. 
I used a stencil to create the circle shape background using  black paint.
I then used Dina Wakley stencils and white paint to create the girl on the front


I also added the saying "Always Choose to see the World through Optimistic eyes"


I added chevron stripes with paint and outlined them with white gellie pen as well. 


Thanks for stopping by. Make sure to check out Unruly PaperArts this month and join in the Reader Art Quests.


Sunday, May 19, 2013

Butterfly Fly Away

I have a few things to share with you today. The first being that my family and I went over to Leesburg Virginia yesterday to The Old Luckets Store there. They were having a big hoorah and had hundreds of vendors there with loads of antiques. It was awesome and so fun to go over and check out all the wonderful goods. Here are a few photos..


this door was amazing, I wanted to buy it for my house haha!!  

talk about having a big head!!  

Wouldn't these be so cool to do in Tim's new fabric?!! I might have to buy me some old suitcases!! 


I had a fun time and came away with an old printers tray, some watch parts and typewriter keys. I also bought funnel cake and kettle pop-corn!! I was actually pretty good, I could have bought SO much more.

Onto crafts now.. for my project today I worked on a journal page. I'm entering this page into the following challenges...
The Octopode Factory Challenge - This time it's all about Music. I used the old Miley Cyrus Song in my page "Butterfly Fly Away"
Stampotique Designers Challenge - This week they are doing "Anything Goes" WOOT! I love anything goes. I only used one Stampotique stamp on this page, but it's one of my new favorites.
Our Creative Corner - This week they are also having "Anything Goes" Double YAY! They have revamped the site and are starting out fresh and new, led by the new owner Laura, be sure to check them out.
Simon Says Stamp Challenge - This week is all about "Flower Power", that's easy for me, I love flowers.

For starters I wanted to use this wonderful Gelli Print that I made a few weeks ago, I love that it has swirls and two big flowers right in the middle. I just love the contrast of color as well.

I used a little Tinkerbell girl from the Octopode Factory Shop
I colored her using a combo of watercolor pencils and chalks of various brands, I did the house the same way but I forgot to photograph it.

For the Butterfly I used three different colors of embossing powders and heat set

I then fussy cut the butterfly out and colored around the outside  with my wonderful Faber-Castell Pitt pen

I went around the entire outside of the page using Tim Holtz acrylic paint dauber

I used  my Memory marker to color the Seaweed Stampotique Stamp and then stamp it onto my page.. this stamp is by artist Jo Capper-Sandon.. this is a seaweed stamp but here I'm using parts of it for my butterfly swirls. 

I then used another marker (Zig) to go over it and make it stand out more and deeper black. I actually colored and stamped my seaweed twice here.  

I also used my white gelli pen to highlight the swirls


I also used a Sizzix Die for the black flowers

Here is my final page, I really love how the gelli print fades into the background so nicely and the characters pop off the page. Gotta love those gelli prints!!! 


The reason I chose this song title is because it reminds me so much of my daughter and our relationship and make me think of the not so distant future, she will be graduating high school and flying away from home like a butterfly. She will flourish and be beautiful and do many wonderful things, I just know it.. 


Thanks for stopping by, have a super Sunday.

Saturday, April 6, 2013

Gelli Plate Prints

I went into my craft room today to make a few prints with my gelli plate. I'm running a bit low and I thought I would just make one or two for a project. Well, I got in there and ended up staying for more than an hour just playing with my plate. Once you get going with it you never want to stop.
I created and created and now I have plenty of gelli prints to use in my crafts for awhile. 
I just wanted to show you what I made today, I'm always so excited about it.


I just love all the texture and fun prints I get when i play with my gelli plate. 

I also wanted to play a little bit again with Tim Holtz distress paints and my plate too. The Tim paints are so awesome they way they move over the plate without having to do anything to them except brayer. It's awesome!
Here are a few pics
I open my bottles and gently pour them onto the plate. I figure it's the easiest way.


If your careful you can just add a few drops to your plate and them immediately put your lid back onto the paint. 

Here is a photo after I brayered the paint, It's so flippin cool. 


working quickly I brayered it again to spread the paint over the plate 

I used two Ranger larger tags and pressed them into my plate, just check out my results. SO cool, I just love the effect that I get with Tim's paints.

I also wanted to show you my "wipe off" pages that I created. I used several different journal pages to wipe my brayer off onto while playing with my gelli plate. I also take my stencils that I've used and wipe them onto these pages.
These will make some pretty cool journal pages 


There are so many fun things you can do with your gelli plate. I cannot wait to use these pages, papers and tags in my projects.