
Welcome back to another week of The Altered Playing Card Challenge. We are on week 22!! Heading to the home stretch here. I see that lots of new people are having fun catching up and those that have been with me since the beginning, it's so fun to see their cards each week. I hope you will all press on through the next few weeks to finish up this deck of altered cards.

If you have missed any of the previous week's here are the links
Week 9
Week 10
Week 11
Week 12
Week 13
Week 14
Week 15
Week 16
Week 17
Week 18
Week 19
Week 20
Week 21
Week 10
Week 11
Week 12
Week 13
Week 14
Week 15
Week 16
Week 17
Week 18
Week 19
Week 20
Week 21
and our Facebook page
and the Pinterest Board link
Pinterest Board
This week I wanted to try something that I haven't done before, Using Elmer's Glue...it's going to be a glue week!
I guess I should have tried it out before I actually used it for the APC challenge, I ended up having a few hick-ups but we're all learning together, right? haha!
So for starters I picked out some stencils and a bottle of good ol' fashioned Elmer's Glue

I taped my stencil over my card and used my finger to dab the glue onto the card through the stencil


I really tried to put on a thick layer of the glue without smudging the stencil pattern too much
I did the same thing with the second card

The circle stencil ended up smudging quite a bit but I figured it was ok
I set both cards aside to thoroughly dry
You can see here what the 2nd card looked like while it was still wet

I cleaned my stencils really well, this glue is super sticky so I had to actually use soap and water to clean them instead of just a baby wipe (please make sure to clean your stencil, the glue will ruin it)
Once my cards were dry, I took some paint and painted my backgrounds
I just used a paintbrush to brush the colors on
You can really see the pattern that the glue made on the left card verses the right
For the left card, I used brown DecoArt media paint and then dabbed on a little of the green over the top

I tried to peel off my glue on the green card because I didn't like how it turned out (you couldn't really see the pattern well) and I think it would have worked, except there wasn't a thick enough consistency of the glue so it wouldn't all peel off....
I decided to outline my pattern with my Faber Castell pen for now

I really struggled with this background because at this point I hated it. I didn't like it at all and felt like throwing it out and starting over
I decided to really work with it and keep going, I added another thick layer of the glue again. This time I put the glue on the card right out of the bottle
I set that card aside to dry

Going back to the second card, this card I loved, I don't know why, but I just really like the way this one turned out. I began by adding a torn piece of paper
The paper was edged with a dark brown ink prior to glueing it onto my card


I then added a piece of Tim's film strip to one side and used his tiny stapler to attach it to my card


I was going to keep this card vertical but decided on a stamp from Tim Holtz's stamp set called Warehouse District .. the mustache men, so I flipped my card onto it's side
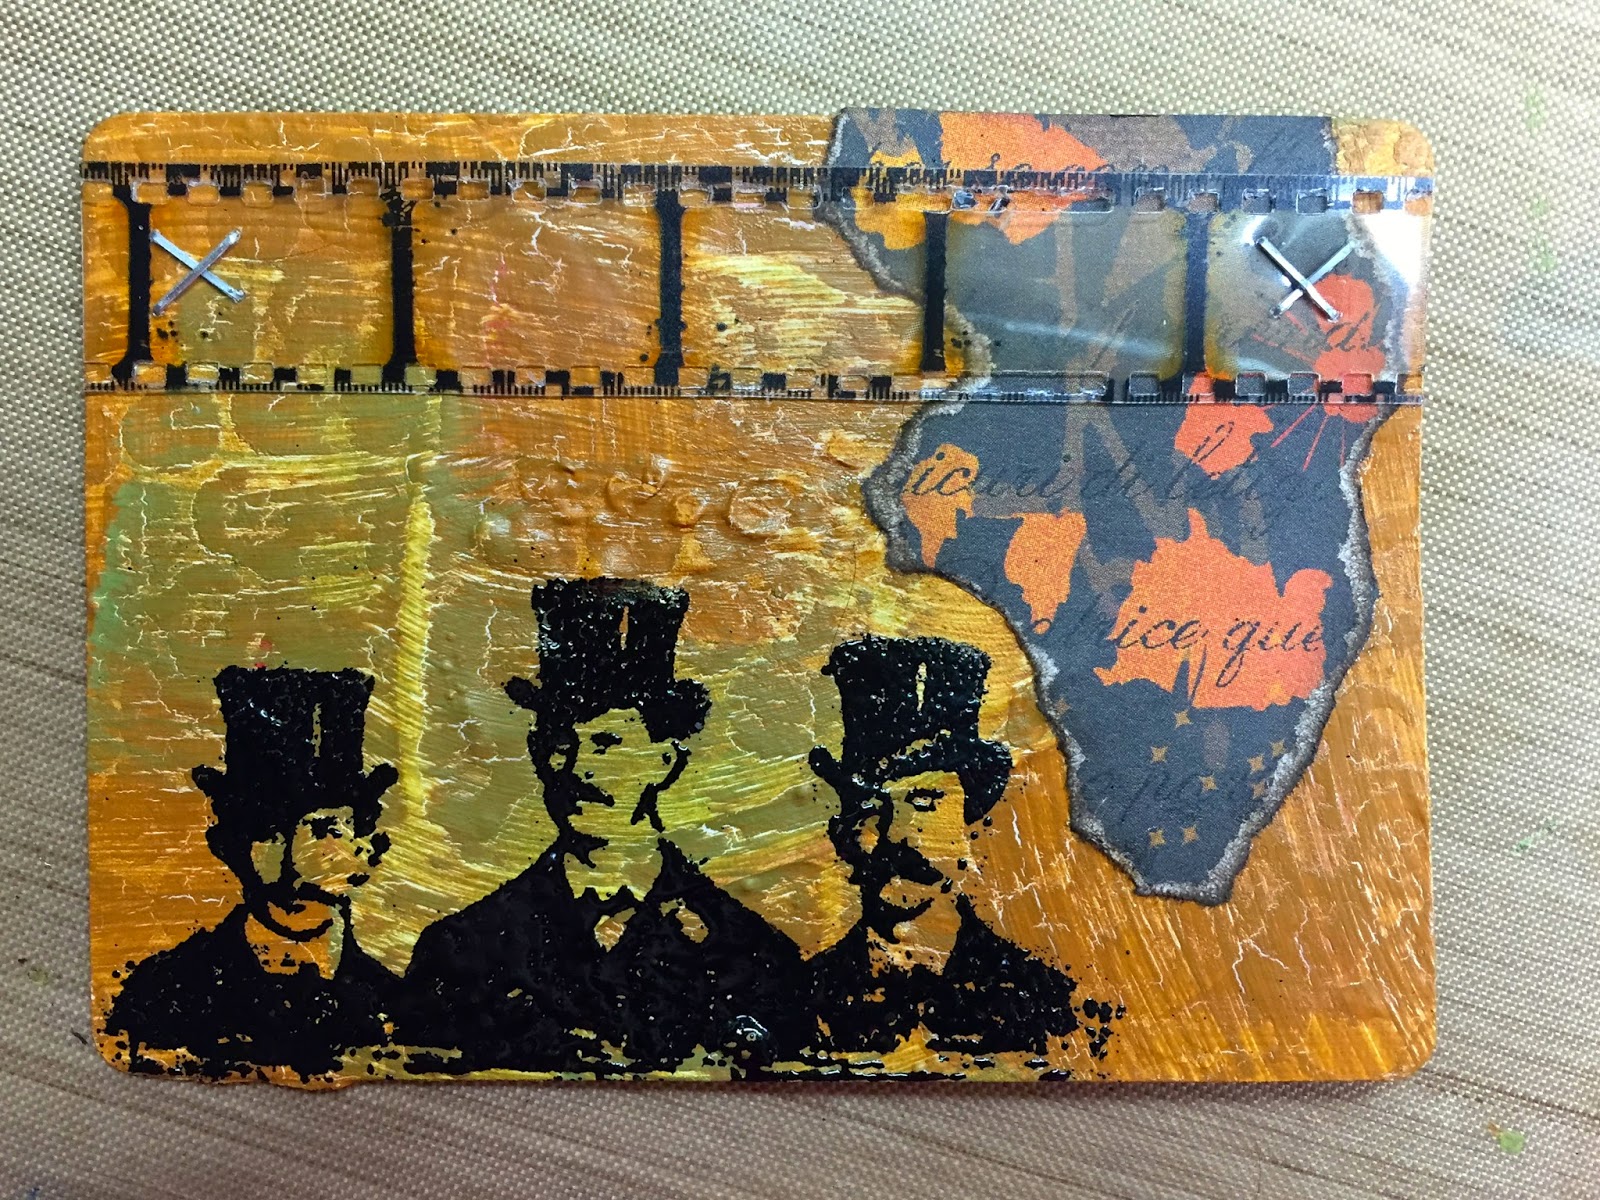
I used Veramark embossing ink and black embossing powder for my guys but be warned, the glue and acrylic paint really wants to bubble with the heat. If you enlarge my photo above you can see right about my middle guy here, there is some bubbling
The "photograph" word comes from the same stamp set
For this I am using my Stampin Up "stamp-a-ma-jig" .. this simple tool allows me to stamp my word exactly where I want it on my card
First, line up your piece of plastic and your blue handle. Then take your stamp and ink it up and stamp it onto the plastic piece


I used Stazon black ink for my word, mainly because I wanted it to be permanent and I was stamping a little onto my plastic film strip piece as well
Lastly I edged my card with Archival black ink and a distress tool

Here is my finished card

Ok, back to the first card again.... Once that card was completely dry again, it looked like this...
You can still see the green paint through the glue AND you can see the zig zags much better I think

Although I have this bright white spot right at the top of my card, I figured I'd deal with it later.
I have this really cool sticky back fabric wash tape and decided I was going to do a little sewing this time, so I took a strip and adhered it to my card and trimmed


Next I put the card into my sewing machine and did some random sewing... if you don't want to sew you can always skip this step OR draw some stitching


Next, I used this beautiful steampunk girl stamp and heat embossed her with copper embossing powder. I used white card stock for this, I also colored her face with Copic markers, I then glued her onto my card and trimmed
(notice how she covered up my white portion? Clever, right?)

I used a sticky note and tore it into the shape of my girl in order to mask her off. I then used a stencil and green ink to create a pattern

By covering up the girl with the sticky note, I don't get any of my stenciled pattern onto her but you can see the pattern all around her

I then used this stamp for my word. I only inked up the word "Discover" with black archival ink and stamped it at the bottom of my card


Lastly, I used a copper marker to draw around my edges
Here is my second finished card

This card didn't start out how I expected but I do like the outcome
And here are my two cards together

This week was a challenge for me, I really struggled with that green card but ultimately it turned out fine. I encourage you to make something great out of something you were going to throw out.
Take care and please share with me what you create!!
See ya next week.
This week I wanted to try something that I haven't done before, Using Elmer's Glue...it's going to be a glue week!
I guess I should have tried it out before I actually used it for the APC challenge, I ended up having a few hick-ups but we're all learning together, right? haha!
So for starters I picked out some stencils and a bottle of good ol' fashioned Elmer's Glue
I taped my stencil over my card and used my finger to dab the glue onto the card through the stencil
I really tried to put on a thick layer of the glue without smudging the stencil pattern too much
I did the same thing with the second card
The circle stencil ended up smudging quite a bit but I figured it was ok
I set both cards aside to thoroughly dry
You can see here what the 2nd card looked like while it was still wet
I cleaned my stencils really well, this glue is super sticky so I had to actually use soap and water to clean them instead of just a baby wipe (please make sure to clean your stencil, the glue will ruin it)
Once my cards were dry, I took some paint and painted my backgrounds
I just used a paintbrush to brush the colors on
You can really see the pattern that the glue made on the left card verses the right
For the left card, I used brown DecoArt media paint and then dabbed on a little of the green over the top
I tried to peel off my glue on the green card because I didn't like how it turned out (you couldn't really see the pattern well) and I think it would have worked, except there wasn't a thick enough consistency of the glue so it wouldn't all peel off....
I decided to outline my pattern with my Faber Castell pen for now
I really struggled with this background because at this point I hated it. I didn't like it at all and felt like throwing it out and starting over
I decided to really work with it and keep going, I added another thick layer of the glue again. This time I put the glue on the card right out of the bottle
I set that card aside to dry
Going back to the second card, this card I loved, I don't know why, but I just really like the way this one turned out. I began by adding a torn piece of paper
The paper was edged with a dark brown ink prior to glueing it onto my card
I then added a piece of Tim's film strip to one side and used his tiny stapler to attach it to my card
I was going to keep this card vertical but decided on a stamp from Tim Holtz's stamp set called Warehouse District .. the mustache men, so I flipped my card onto it's side
I used Veramark embossing ink and black embossing powder for my guys but be warned, the glue and acrylic paint really wants to bubble with the heat. If you enlarge my photo above you can see right about my middle guy here, there is some bubbling
The "photograph" word comes from the same stamp set
For this I am using my Stampin Up "stamp-a-ma-jig" .. this simple tool allows me to stamp my word exactly where I want it on my card
First, line up your piece of plastic and your blue handle. Then take your stamp and ink it up and stamp it onto the plastic piece
Next, line up your plastic, stamped word where you want it to fall onto your card
and last, stamp your word stamp... note: see how the corner of my stamp block lines up with the corner of my blue handle, just like the plastic did in the above photo? That's how you get your word in the correct spot
I used Stazon black ink for my word, mainly because I wanted it to be permanent and I was stamping a little onto my plastic film strip piece as well
Lastly I edged my card with Archival black ink and a distress tool
Here is my finished card
Ok, back to the first card again.... Once that card was completely dry again, it looked like this...
You can still see the green paint through the glue AND you can see the zig zags much better I think
Although I have this bright white spot right at the top of my card, I figured I'd deal with it later.
I have this really cool sticky back fabric wash tape and decided I was going to do a little sewing this time, so I took a strip and adhered it to my card and trimmed
Next I put the card into my sewing machine and did some random sewing... if you don't want to sew you can always skip this step OR draw some stitching
Next, I used this beautiful steampunk girl stamp and heat embossed her with copper embossing powder. I used white card stock for this, I also colored her face with Copic markers, I then glued her onto my card and trimmed
(notice how she covered up my white portion? Clever, right?)
I used a sticky note and tore it into the shape of my girl in order to mask her off. I then used a stencil and green ink to create a pattern
By covering up the girl with the sticky note, I don't get any of my stenciled pattern onto her but you can see the pattern all around her
I then used this stamp for my word. I only inked up the word "Discover" with black archival ink and stamped it at the bottom of my card
I added a few random black circles here and there (again with lids to bottles, I've shown this in previous sessions) and also added some white lines with acrylic paints
Lastly, I used a copper marker to draw around my edges
Here is my second finished card
This card didn't start out how I expected but I do like the outcome
And here are my two cards together
This week was a challenge for me, I really struggled with that green card but ultimately it turned out fine. I encourage you to make something great out of something you were going to throw out.
Take care and please share with me what you create!!
See ya next week.
These look great Claudine. Love the copper lady. I am still with you, although a bit behind. I have a lot part finished. Must sit down and catch up a bit this week. Can't believe we are nearly there!! Don't know Elmer glue. Must be american. Might resort to texture paste, or maybe wood glue would work?? Improvisation makes it even more interesting. Hugz
ReplyDeleteThese two cards turned out great. I haven't tried any of the challenges yet, but I may do this one since I happen to have Elmer's glue and never thought to use it this way.
ReplyDeleteVery creative! Have you ever tried playing with rubber cement? Off to get sticky and inky!
ReplyDeleteLOVE these! The first one especially is right up my street, and I love how you turned the other one around and made something awesome out of it.
ReplyDeleteLove these Claudine...glad you didn't scrap the card, it turned out wonderfully. They have a safari feel to me.
ReplyDeleteI appreciate your candor when it comes to crafting experiments that run into difficulty. Here are mine. I'll post them on your FB page too.
ReplyDeletehttp://2amscrapper.blogspot.com/2015/02/week-22-altered-playing-cards.html
Claudine thank you for sharing another week of this project. I just love and adore your creativity. And I LOVE that you share with us both the good ones but also the ones where it starts out looking looking as a mistake. And of course due to your skills ends up lovely...lol
ReplyDeleteThank you for great and detailed tutorials.
Hugs from Monica..... Spain
I had to laugh at your post this week, Claudine. Mine were the opposite of yours. My glue was too thick, and yours was too thin. However, I love how you made yours work in the end. It takes a skilled artist and lots of good products to turn these into works of art. Bravo.
ReplyDeletehttp://alteredbooklover.blogspot.com/2015/02/altered-playing-cards-week-22-glue.html
This was a fun technique to experiment with, and I am glad you shared the issues you had and how you overcame them. My Elmer's was not useable, so I used some thicker glue and had interesting results. Here are my cards:
ReplyDeletehttp://craftymoosecrafts.blogspot.com/2015/02/apc-22.html
Have a great weekend!
Hi Claudine!
ReplyDeleteLove both your Steampunk cards! So glad you kept going with them both. Love both stamps you used, extra cool! The glue in stencil was really fun, never would have thought to try it out, so happy you shared!
Posted my pair on the FB and here too.
Have a great week!
~kim
http://tangledbluerose.blogspot.com/2015/02/apcc-week-22stencil-with-white-glue.html
Well blow me down and stand me back up again!! It's taken 4 months but here they are. Just a few more and my deck will be complete. Hugz
ReplyDeletehttp://craftynomad.blogspot.no/2015/06/to-two-too.html