Pages

Showing posts with label embossing folder. Show all posts

Wednesday, November 12, 2014

Compendium Of Curiositues 3 Challenge #15

I have been so behind on my CC3C challenges, I think I've missed 3 so far. My life has just been so busy lately and with my surgery I've gotten behind. 
I so love the challenges and since I have more time at home now that I can't drive I have time to create! YAY!
I needed to create a birthday card for a friend's son who is having his 19th birthday soon so I decided to use this challenge to make him a card.
You can find this challenge here: Linda Ledbetter and Studio L3

You can get a copy of Tim's Book here: Tim Holtz and he will even sign it for you

Linda's sponsor is Inspiration Emporium who will give one random person 50.00 for their store!!

AND one entry chosen by the Design team will win a prize pack from Tim and Mario themselves!! - make sure to follow Mario On Instagram , he's a hoot!!

This challenge is on page 38 of Tim's book and it's all about Cabinet Card Pockets
These little pockets are so versatile and fun, I have a pack and just love them

Here is my creation for this challenge and for my friends son for his b-day


I stamped my butterflies onto the tag first and then again onto vellum, cut them out, in order to make them stand up


I also used Tim's Shadow Press Moments embossing folder to create the word

This was so fun to create, these cabinet cards are great!! 
I hope you have enjoyed my creation today
CHEERS!!!

Monday, October 13, 2014

Altered Playing Card Challenge Week 7

Welcome back to another week of the Altered Playing Card Challenge
I'm so excited that this challenge continues to grow and we continue to get more and more playing along.


If you have missed any of the previous weeks
Here are your links 


and our Facebook page

Facebook Group

If you would like to follow along on the playing card challenge Pinterest Board here is the link

Pinterest Board

I made an artist trading block awhile back based on the twelve tags of 2014, the post is HERE

I really wanted this week's theme to be based on that  same theme, sort of a "Sea" theme
So for my first Altered Playing Card I went with the seahorse thing.

To begin this card I used a piece of packaging plastic and a "bubble" embossing folder
Running the plastic through the sizzix to create my embossed plastic


I also used grungeboard and a seahorse movers and shaper to create my seahorse


I used different colors of card stock and a Tim Holtz die to cut out my leaves


For the background to all this I used several different shades of distress inks and applied them with a sponge


This is a cool mistake, I had no idea that when I applied drops of water to my distress ink that they would react like this, how cool is this? I'm guessing that since we applied gesso first that the effect was cause by the gesso underneath the distress inks


I used several colors of Distress paint (you can use any kind of paint you want here) to color my seahorse
I also used clear rock candy over that to get some cracking in my horse, I set aside to dry


I then edged the horse and also the leaves with Archival ink


I then used my card as a template to cut my embossed packing plastic the right size


I used a piece of redline tape right in the center of the plastic in order for the center to stay down. I then used my mini stapler to staple the edges
Look at that background, you can see some of the original card through the blues, I love it!


I then used glossy accents to glue down my leaves and seahorse


I then wrote my sentiment on a piece of paper that was previous colored with archival inks and adhered that with glossy accents as well.
Here is my finished card


Now if you don't want the dimension like I have achieved here, you can always just stamp the bubbles, leaves, seahorse etc instead of using what I did. 

For my next card I decided to used painters tape to block off the section of card I wanted to stamp my image
My main image is going to go under this tape


I then used several different colors of inks to color my background
(my card previously had the swirls in each corner, I did this into my gesso when I prepped my cards)


I then used some nautical stamps to stamp onto my background in a dark brown ink
I also went around my edge with black ink


Then you just carefully peel your tape up and you have this white space


I then used black ink to stamp my ship
(this is a Stampin' Up stamp set I bought years ago)


I used distress markers and a water brush to color my image, it looked like a watercolor when I finished


I then used some leftover tag paper to stamp my anchor 
I used colored pencil to color my anchor but I could have used the distress markers here again
After I colored my anchor I cut it out


I also stamped my word onto some rick-rack leftover paper and cut it out like a banner ribbon


I adhered both the anchor and word to the upper corner of my card


Lastly I colored my swirls with black marker, here is what my finished card looks like


and here are my finished two cards for this week


I hope that you have enjoyed this weeks card, I always love seeing what you all put together. 
Have a great week!!!


Tuesday, October 1, 2013

Autumn Tags - Tim Holtz Style


I have really been in the Autumn/Fall mood lately. I'm really loving the change in weather and the trees are beautiful. I wanted to take part in the All Things Tim yahoo group challenge for the month of September, The theme is Fall and it's right up my alley.
I am entering the second tag into the Simon Says Stamp Monday Challenge Blog - The theme this week is Say it with Stamps... On the "fall" green background tag, I said it with Tim Holtz stamps haha!!!


I actually ended up making two tags because I wanted to use my new Sizzix acorn stamp and cut die by Tim Holtz and I had two ways I wanted to use it. 


I used embossing ink and the acorn stamp first. I wanted to give the acorn some nice shimmer so u used this Stampendous glitter embossing powder. 
I then used the dies to cut out the acorn.


Once it was cut out I colored it with distress markers and the water brush.

You can kind of see the shimmer of the embossing powder in the photo below. I love how distress markers make it look like water colors.


I added some distress stain onto my craft sheet and ran my tag through it a few times for my background.

I wanted to emboss my background with an embossing folder so I used this Sizzix leaves folder and ran it through a few times.
I then went over the embossed leaves with Gathered Twigs Distress ink.


Once that was done I created the letters using dark brown cardstock and Tim's "wanted" letter strip.
I also cut out the bird using the same color cardstock and Tim's movers and shapers.
I added some brown ribbon and a word charm.


I love the outcome of this one, it's so subtle but pretty.


For the next tag, I wanted to use a green background so I used several different green distress stains this time. They were a bit bright so I also added a touch of browns and oranges. 


I then used Adirondak ink to stamp my acorn into the background for placement purposes.


I then used Tim's new stencils and some Archival inks to create my background. I used several Crafters Workshop Stencils as well.


I grunged up the edges using my distress tool and went around it with distress ink. I am really loving how the background came out. 

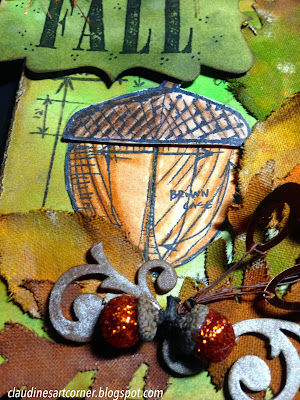
Next, I got to work on my acorn. This time I wanted to do a bit more paper piecing with it so I stamped it in archival black and then colored it with distress markers.

I then used my cutting pieces to cut the acorn up.


These are the pieces I ended up with.


I wanted to use some leaves and the hanging sign so I used Tim's dies and cut the sign out of cardstock and the leaves out of muslin.


For the leaves, I used distress paint in several colors to color them

I love the way the muslin curls up when its wet with the paint. It gives the leaves a real-ish look.


I also used some cardboard swirl cut outs and colored those with different colors of brown distress stains and then went over them again with Tarnished Brass distress stain to give them a shimmer.


I then colored some more muslin with distress stains for my ribbon topper


Putting this tag all together was fun, I just love how it came out. It's one of my favorites. The acorn topper was put on with diminsionals so that it stood up above the rest of the acorn.
I stamped the word fall using Tim's 
Worn Text stamp set.


I added some small acorns to the bottom and some embellishments. 


You can kind of see in the photo below how the top of the acorn is dimensional.  


Thanks for coming by, I hope you liked my tutorial on these tags. That acorn die and stamp set are awesome. I can't wait to get my hands on some more of those sets from Tim Holtz!!
CHEERS!!!