Pages

Friday, May 29, 2015

A Calendar Cover

Welcome to the blog, today I wanted to show you a calendar cover page that I sort of created. What I mean is, my friend Terri made this wonderful calendar for me and she decorated the cover a bit but she left it for me to add to. 
So finally yesterday I worked on it

This is what the calendar looks like

This is the back cover - Terri decorated it for me


She decorate and drew on the month's beginning for each month, it's just beautiful


She is so talented and I just cherish this calendar


This is one of the inside pages, she drew little things for each holiday throughout the year, I love it!! Excuse my appointments haha


I sadly did not take a photo of the cover before I added to it but that's ok. 
Terri did the background and what's funny is, she had sent me some drawings of flowers and her artwork that were blank (without color) and I colored these flowers and butterfly and cut them out. I then wanted the flowers to stand out so I added some black acrylic paint to the background behind the flowers. I printed the sentiment off and added it, I then sealed the entire cover with a glossy sealer.
To be honest, Terri did most of this and I just colored her drawings haha! It's perfect and I love it


Thanks once again for coming by the blog. Have a wonderful day!!!

Wednesday, May 27, 2015

Stampotique Challenge 197 - Tin is In

Welcome back to the blog everyone and thanks for stopping by.
Today is Wednesday which means it's time for another challenge over at: Stampotique Designers Challenge Blog
and our wonderful hostess this week is Janet Klein and her challenge to use is "Tin Is In"
This is what Janet says about this challenge:

"Tin can be an exciting and unexpected element in your stamping projects. So put on you tinking caps" and reach for some craft tin-an Altoid container or upcycle with a can or other tin object."

I began by finding a tin, I decided to use this tin that I got from Cracker Barrel years ago, I always save my tins


I started by covering the tin in gesso in order to prep it for paint


I used acrylic paint in a salmon type color for my tin


Next I stamped some of Stampotique's stamps all over a piece of tissue paper, I used a few different archival ink colors for this


Once everything was dry I applied the tissue to my tin with glue


In order for my piece to stand up I created a base using cardboard. I painted it first with the same salmon color


I then applied another darker color of paint


I then stamped onto the base


I used Carrot and colored her with Copic Markers,
she is going to pull my cart with the 3 In A Round boys


I added buttons for wheels and a pulley string
Here is my final piece


For this project I used Stampotique stamps:

3 In A Round ,Carrot - By Daniel Torrente
Design Cube 2 - By France Papillon
Love Definition - By Amy Wilson Wellenstein
French Text - By Jo Capper-Sandon

So take on this challenge and come by the Stampotique Designers Challenge Blog and join in. You could be one lucky winner to win a 30.00 gift certificate to the online store. 
Have a great day!!

Monday, May 25, 2015

Altered Puzzle Week 5

Welcome back to the blog, it's Memorial Day today so Happy Memorial Day everyone!! 
We are onto week 5 of the Altered Puzzle Challenge and starting row #2 


Here are the links to the previous posts for this challenge


Our Facebook group is here:

This week we are starting on the second row to our puzzle, pieces 7 and 8.. I decided to go with something simple for these two pieces since it's a holiday week


starting with piece #7 I began by using Dylusions Sprays and 
a water spitzer, first spray the puzzle piece with water and then spritz with Dylusions, I just kind of let the colors run


Once everything is dry I used a piece of punchinella (you can also use any stencil) and my black Zig marker to create circles here and there


I then used my white gelli pen to doodle a bit


I used a piece of gelli print leftover paper to cut out some triangles for the edges 


I then used my Zig marker again to doodle
(if you haven't noticed I love to doodle) 


Lastly I printed out my sentiment, cut out, edged and glued
This is my final piece


For my next piece I began by using Archival Ink in a brown color and a stencil 


I also edged the puzzle piece with the same ink


I added some black wash tape here and there


I then used some of Tim Holtz Chitchat stickers for my sentiment
I also used Tim Holtz framework die to create the little chevron across the front


I used my white gel pen to outline my "ok" word which was created using black card stock and a Tim Holtz die


Here is my finished piece


Here are my two pieces together


These were fast and simple but the outcome is no less exciting. I hope you have fun creating your pieces for this week and enjoy your Memorial Day!! See you next week
CHEERS


Monday, May 18, 2015

Altered Puzzle Week 4

Welcome back to the blog today, I'm actually posting the challenge this week on time haha!! 
We are onto week 4 of the Altered Puzzle Challenge 


Here are the links to the previous posts for this challenge


Our Facebook group is here:


This week, since we aren't worried about the pieces being flat, I decided to do some embossing and add some embellishments.

I started out with my first piece, painting the background a light brick sort of color


I then used embossing ink and two kinds of powder, I just dabbed the pad directly onto my puzzle piece here and there and added the powder and heat set


Once I was finished I wanted more so I added more....


This was how it was when I finished


I wanted to add a bird of some sort so I used a Dyluisions set and stamped my bird onto some patterned paper
I used clear embossing ink for the bird and cut him out


I added some ink and stenciling to the background
(guess I should have done that before the embossing, o-well)


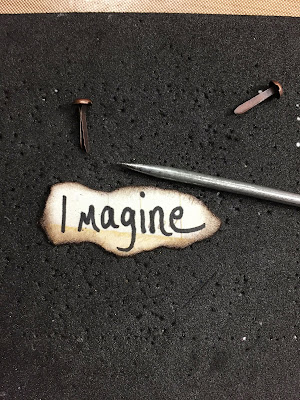
Next I wrote the word Imagine onto the same paper that I stamped the bird and tore it out and inked the edges with brown archival ink


I then punched a hole in each side of the word so that I could add brads


I adhered everything to my background and whalla!! I love the way this piece came out


For my next piece I used DecoArt media paint in a burgundy color


The color was a little bright for what I wanted so I added a bit of a darker color


After that has dried I used a stencil and black embossing paste to add some texture


I really love how that texture came out


I set that aside to dry

for the next step I glued some Tim Holtz paper onto cardboard
and used a butterfly mover and shaper die to cut out


I edged my butterfly with a black marker and I want my wings to stand up so I bent the butterfly right down the center a tad


Next, I grabbed some Tim Holtz ideology flowers and put them together with a brad
I'm going to use this in one corner of my piece


I stamped my sentiment onto that patterned paper and embossed and tore out


I also edged with brown Archival ink


I also wanted to use some pearls on my piece but I didn't want white pearls and that is the only color that I have at the moment. This is a perfect trick - Use your copic markers to color the pearls whatever color you want!!! 


After my background was dry I added everything, I only applied glue to the middle of my butterfly here so that the wings can stand up


and here is my finished puzzle piece


and the two together


I hope that you like the two pieces for this week, they are different but so fun!
This is what your first row should look like now... next week we start on the second row.


Have a great week everyone, see you next Monday!!