Pages

Tuesday, May 28, 2013

Will You Love Me When I'm Old?

Good afternoon blog friends. It's starting to warm up again here in Virginia, let's hope it stays warm for awhile. Last week it was back down in the 50's for a few days. brrr!

For today's project I am still working on filling my 7 Gypsie's Library Drawer so I made a 4x6 card and I'm going to partake in the challenge over at Simon Says Stamp and Show, this week it's all about, "Into the Woods". Anything woody or woodland creatures or anything to do with wood is fair game. Of course they always give away a 50.00 voucher to one random winner, so that's a super plus to joining. You should definitely check it out and play along.


I started my project with some of Tim Holtz Idea-Ology Glassine paper and the woodgrain embossing folder to create a tree trunk wood background.


I used a combo of walnut stain and black soot distress inks to run across the top of my glassine paper to create depth and bring out that woodgrain.
I also used a piece of off-white card stock for my background and used the Paper Distresser and walnut stain ink on the edges. I really like the way the glassine looks, the wood embossing looks so real

Next I used a cut out of the Umbrella Man that I had done a long time ago for a postcard. I used the inside of this die for my postcard but I had kept the cut out for some reason and so I decided I wanted to use it here. I had cut this out of black cotton fabric.
I adhered him to my card with glossy accents, I love that you see the wood through him

I used some of my Tim strip dies to make some paper flowers and flourishes for the bottom righthand corner
I also edged them with walnut stain

For the middle of the flower I used a small strip of glassing and just rolled it up. I adhered the flower together with my glue gun 


I then used some red paper with black writing and Tim's Mover and Shaper Heart to make a heart. I didn't use the heart that was cut out, instead I cut another heart to mimic the umbrella man, so you can see though it and there is an outline of the heart

I used a phrase that I had laying around from years ago (I swear I save everything LOL) edged it with walnut stain and adhered with the glue gun
Lastly, this is the great part..... I was looking for some ribbon to add to this piece and while looking through my ribbon box I found this stuff. it's hard and looks like rolled up wood, I'm not sure what it's called or even when or where I bought it but it was perfect! I adhered it around the edges of my piece with the glue gun. 
I love when I'm looking for something and I find something else that is perfect for my project. haha!!

Here is the finished 4x6


I really like the sentiment with this piece because wood really does seem timeless, it gets old but it's always so beautiful, thus, it never seems to grow old. Even the oldest of trees have so much beauty.
Thanks again for stopping by, I hope you have a fantastic day!!
Cya next time.

Monday, May 27, 2013

Memorial Day

I had to stop by and tell you all to have a wonderful Memorial Day with your families. 
To all the men and woman who serve for our freedom and to those who have lost loved ones, sacrificed everything and have been laid to rest for us, you are appreciated!!!


Sunday, May 26, 2013

Postcard Project


I have decided that I want to start making more postcards instead of so many tags. I want a good way to store my projects that I don't plan on giving away or using in some other way. I have this 7 Gypsies recipe card tray that I'm using to hold all my 4x6 cards. I put feet on it too, using Tim Holtz Idea-ology foundations feet. I've decorated all the tabs and have added a few Journal prompts from a swap I was in on my AllThingsTim yahoo group. That front card was made with some awesome Graphic 45 paper.


For this project I had to join a few challenges (of course) here is a list of the challenges I'm joining with this one...

Hobby Cutz - This week they are challenging us to add some flowers and or roses to our projects.

Octopode Factory - Their challenge this week is "Lovely Ladies", I really like this theme. 

613 Avenue Create - This week is Anything Goes! Woot!

This is going to be a bit of a rushed post, so here we go....

To start I used Coordination's Craft Core dark brown paper and ran it through the Big Shot inside a Tim Holtz gear embossing folder, then used my handy dandy sander and sanded it up.

I then used Gathered Twigs Distress Ink and went over the raised parts in order to highlight them more

I then did something I haven't done in awhile and got out my perfect pearls, I dusted the background with Heirloom Gold and spritzed and heated to set

Tore printed paper, edged with gathered twigs


Cut flowers with tattered flowers strip die, went around edges with marker and then stamped with Archival and Wendy Vecchi numbers. Made more and layered them.
(got this technique from Clare Lloyd over at Unruly PaperArts)


Ran ribbon through antiqued bronze distress paint, dried to set
made a bow


Colored my Octopode Factory Audrey Gal with a combo of distress markers, gel pen, colored pencils and copic markers

Here is alink to Lilly's shop if you want to check out her digi stamps 

Added some Tim Holtz Film strip with the mini stapler

Put everything together and here is how it turned out....


These flowers are so cool, I added buttons to the center


I also edged the entire card with my metallic marker


I also added some of Tim's Metal ide-ology gears


Thanks again for stopping by, I hope you are a designer of your own dream!! 
Happy Day to you!!!

Finished Necklaces

It's a beautiful spring day here in Virginia, the sun is shinning and the birds are chirping. I'm getting ready to head out with the family to do something totally unproductive! haha!

Remember my post where I created a going away card? If not, here is a link to the post "Going Away Card" .... I showed you at the end of the post some pendants that I was working on to sort of match the card. I did the background for the pendants the same that I did the front of my card. 

Well, the ice resin finished setting up and I put together my necklaces this morning and I wanted to show you my finished pieces. They turned out really great. 

I used Vintaj brass colored wire to string my small beads and created head pin for each one. I also used Tim Holtz Idea-ology tassels on the bottom portion and mini gears for the inside.


Both necklaces are not the same but I think they both turned out great.  


I used Spellbinders Media Mixage for the bezel and some found objects and watch parts for the innards of each one. 
Thanks so much for coming by today, have a super day!!

Friday, May 24, 2013

What Makes Me Happy?


Over at my online ATC group we have been doing weekly challenges headed up by a gal named Raeven and for this challenge we had to do a page all about what makes us happy. Not just sorta happy but deep down to your soul happy and to make things even harder, we could not use out Family, children or husband. Well, just throw me off a bridge why don't ya?! haha!! That about sums up what makes me Deeply Happy into the pitt of my soul. 

So I had to think on this one and I came up with a few things that really make me happy and feel peaceful. 
I am entering this journal page into the challenge over at Stampotique Designers Challenge Blog - This week they are challenging us to use "Text" on our pages. I used a whole lotta text on this one. 

Not going to do a long tutorial today, I'm in a bit of a time crunch tonight. 
For starters, I used my Dyan Reaveley Dylusions Journal, love this journal and also some Dylusions Sprays. 
I stamped a text stamp from Wendy Vecchi onto my background with Versamark and heat embossed that with Ranger's clear embossing powder. Once that was done I then used two colors and sprayed the entire background.


I love how the text is choppy in some areas and how it resists the spray.
Then I took some stencils and used the ghosting technique with a water spritzer. I also used various stencils and Archival and distress inks for my background.


Loving this background..
I stamped my Girl With a Heart Purse onto another sheet of white cardstock and colored her with markers. I also did this with my Teddy Bear, I then fussy cut them both out.
I used my 3 In A Round stamp but only inked up the circles and not the boys so that I could use just the circles on my page.
(all of these stamps are by artists Jill Penney and Daniel Torrent)
I also added a stencil made from Tim Holtz movers and shapers butterflies and a corrugated card stock butterfly and lastly some washi tape! Fun!

Here are some photos of my finished journal page....


So what makes you happy besides, family, spouses and kids? (I cheated a little and used my husband hehe)
I actually can come up with plenty more things that make me happy. Maybe I will continue this journey and do more pages of just things that make me happy. This was fun.


Thursday, May 23, 2013

Time To Go

Well, it is time for us to move again. If you haven't already heard my husband is in the Air Force and after being in Northern Virginia for 4 years, we are being stationed in back to Colorado. 
I felt I needed to make a goodbye card..... (stay tuned, there is a matching pendant at the end you will want to see too!!)


Of course I can't create without joining in on a few challenges, right?
I am entering this into:
Frilly and Funkie Sunday Share - This is an open theme, you just need to use something that you purchased from The Funky Junky Boutique and I am using my wonderful Metallic Distress paint on this one! This shop is owned by another wonderful gal, Linda, so sweet and talented she is.

Simon Says Stamp and Show - The challenge this week is "Favorite Ink", which is super hard to choose just one! WOW! I love them all. However, in the spirit of the challenge, I chose Vintage Photo (I used Evergreen Bough too) hehe!!

Hobby Cutz Challenge - The challenge over there is "More than One fold" I folded mine twice :) so I think it counts 


I started out this by choosing my distress inks, since Vintage Photo is one of my favorites I had to use that and I added Evergreen Bough as well. These two look awesome together.
I swiped a little onto my craft sheet, misted with water and ran my jumbo tag through it, front and back.

I had a vision in mind for this card so I cut a hole in my tag in exactly the spot I needed it. I used Tim Holtz movers and shapers Sized Circles for that. These are great because you can move them around wherever you want them to cut.


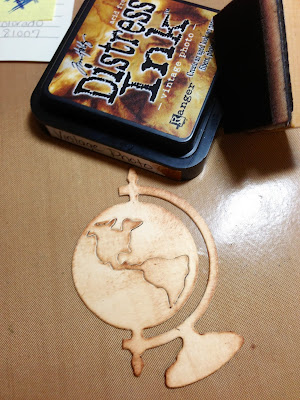
I cut out a Mini Globe from card stock and then used the Vintage Photo distress stain again to color it.


I then cut out another mini globe and cut the center part out of it. I used that as a mask in order to stamp

I stamped a Tim Holtz map stamp across the top using Vintage Photo Distress Ink.

I used my black pitt pen to color in the center and then went over that with glossy accents


I used another Tim stamp from the set "Mixed Media" and Archival Ink to create lines on the front of my card

I used an oval that I cut out using scrap paper as a template and also stamped the inside of my card

I used my Distress Marker in the Vintage Photo color to go around the oval and also added that inside piece from the scrap globe I made.

I used Tim's Envelope  die to make small buttons for the front of my card. I cut these out with grunge paper.

I then used Distress embossing powder in Vintage Photo (of course) to make the buttons have a bit of a grungy look. I inked them a bit with Black Soot Ink as well.
Those were added to the front with brads.


I also did the same with this little hinge and added a few small copper colored flat beads.


I had made the front flower awhile back and it was just sitting there on my craft sheet, it worked great! Sometimes it pays off not to clean up. haha!!
After that was all done I used my Tarnished Brass Distress Paint to go all around my cards edges, it added just the right touch.


I used these three colors of distress paint to color my tag for the inside of my card. Including Vintage Photo of course. :)


So last but not least... I cut small letters from Tim's Typeset
strip die.
Here is my finished project...


I left the inside oval blank so that I could write something there to a friend of mine.


Last but not least, I wanted to show you a matching pendant I made. I bought some ice resin the other day and had an itch to try it out. I decided I wanted a pendant to match this card.
I started by using the same process as before.
I cut a circle using my Spellbinder Die that matches my pendant.

Instead of stamping with distress ink I used Archival since I wanted it to be permanent and not run once I pour in the ice resin. The paper turned out great and matched the card wonderfully.

I then added my embellishments, Mostly Tim's holtz trinkets but some were odds and ends. I made two, just in case, one larger and one smaller. The smaller piece also has a Tim Holtz Sticker Word in it. Lastly, I mixed the resin and poured it in. I'm waiting for that to set now. YAY!! After it's all set I will make a necklace. 


I hope you have enjoyed the tutorial today. Sorry for the long post, I just had more steps to this process. Have a great day!!!