

Simon Says Challenge - They are celebrating their 4th Birthday this week, way to go!!
Stampotique SDC94 - Their challenge this week is "Flowers", woot!
613 Avenue Create - Their challenge is "Spring Fever", YAY!
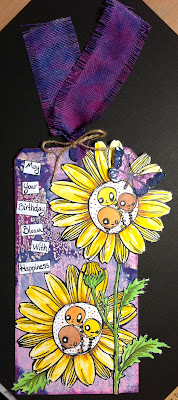
With all that in mind I chose one of these Ranger Jumbo tags to work with, the one on the left.
If you want to see how these tags were made with Distress Paints and my Gelli Plate you can go HERE to find out how I did them.


Since this gelli plate print was made with Tim Holtz new distress paints I decided to do my entire tag in Distress Paint.
I started by stamping this huge flower and stem (from Steampendous) with black Adirondak ink, I wanted to make sure if I paint these the ink would not run.
I decided to use my 3 In a Round stamp from Stampotique by Daniel Torrent and Jill Penney for the center of my flowers so I stamped those on the same paper in black also.


I used all these colors of Distress Paints for this project.

For the base of my tag I used Spun Sugar and a stencil that was the same shape as my flower to go around and build a sort of "mask".. (this Stampendous set comes with the mask and the stencil for this flower)


I dabbed some of my paint onto my craft sheet and used a paint brush to paint everything. For the Flower, I brushed from the center of the flower out in a stroke kind of motion. This gave the flower a little depth. I DID NOT use water with my paint. I wanted as vivid of color as possible so I only used the paint without spritzing with water.


I did the same thing with the center of the flower here. You wont see all if this center once the guys are in place but you can see what I did here.

I then fussy cut my flower out. I also painted my 3 In A Round guys with the paints in various colors and with them I used my paints and water mixture. I wanted my guys to be less vivid and ore opaque so I added water to my paint and used a paintbrush to paint them. I also added small dots around them to act as the center of the flower.

I painted the stem and this time I used mowed lawn first (with water added) and then went over the stems vein lines with Peeled Paint (without water added) in order for the stem to be more life-like.

Adding the Peeled Paint gave the stem more life and depth

I also used this moth from a Michael's stamp set and painted it as well. I used Seedless Preserves (with water) and Chipped Sapphire (without Water) it's tough to tell the difference but the Sapphire is a little darker in tone than the Seedless Preserves. I also added Glossy accents to the Sapphire parts of the wings (not pictured)

I wanted a ribbon for the top of my tag and I really wanted it to match so I used some fabric ribbon and the Distress Paint.(again in the colors Seedless Preserves and Chipped Sapphire)
I just dabbed some of both colors onto my craft sheet and spritzed with water and ran my ribbon through it. Heat set it and BOOM, I've got a great ribbon to match my tag.

Once everything was colored, I basically fussy cut everything out and adhered it all to the tag with glue.
I wrote the words onto white cardstock and edged them with black marker.


This was a fun tag to make, it's big and it's bold and along with those fun Stampotique characters it makes for a great Birthday card. It's a card but not a card haha!
Thanks for stopping by and I hope you have enjoyed the tutorial, it's so simple to paint with the distress paints and there are so many ways to use them, the possibilities are endless.
If you haven't already entered my give-a-way make sure to check it out HERE and enter. The Deadline to enter is April 14th.
SO much fun and what a great way to use the paints!
ReplyDeleteOMG!! This is so cool!!!!
ReplyDeleteHi Claudine, you ROCKED the flower challenge this week at Stampotique Designers Challenge! The colours are SO bright & cheerful AND your flowers are just the cutest! Thank you for playing along with us. Gez
ReplyDeleteMarvellous art and completely inspirational! Thanks so much for joining in with us at Stampotique this week, good luck in the draw x
ReplyDeleteAhhh, I see you went at it without me again, whoa is me....Luv this tag, and those funny people you used, great colors. Funny story, yesterday I'm making dinner and am frying some eggplant, looked down at the finished piece and thought immediately about those white spots on these tags....only my eggplant was a sweet light brown with lite spots! Never know where inkspiration comes from do we. Ever paint on eggplant? sorry, just couldn't help meself! hugs
ReplyDeleteGorgeous techniques with paint and gorgeous flowers. Thank you for playing along with the HAPPY BIRTHDAY Challenge over at the Simon Says Stamp Challenge Blog this week!
ReplyDeleteAwesome job! Absolutely LOVE LOVE LOVE those flowers. This was one of the best Stampotique challenge ideas yet! Thanx so much for sharing and for the inspiration!
ReplyDeleteKimMJ
bast830@comcast.net
What a fabulous 'not a card'. Those flower centers are , what can I say, not at all me but 'adorable'. Did I happen to mention I have a birthday in July?
ReplyDeleteI love this, it's so bright and colourful and it's great to see how you put it together. Thanks for joining us at Stampotique x
ReplyDeleteFabulous tags, thanks for sharing how you made it. great techniques!
ReplyDeleteThanks for sharing with us at 613 Avenue Create and hope to see you again soon.
Hugs,
Sandy
AWESOME step out and the tags are FABULOUS!!!!!!
ReplyDeleteAmazing tag, love the vibrant colors of your flowers. Thanks for joining us at Stampotique Designer's Challenge.
ReplyDeleteTotally cool! So glad for your tutorial pointing out all the little details. Don't know that I would have noticed/realized all your steps that added up to such a fab tag! BTW, congrats on your win at Stampotique!
ReplyDeleteLove everything about this tag, Claudine! As sweet as it is, the real creativity in this tag is HOW you created it! Amazing process! And, the frosting on the cake? Your beautifully colored ribbon!
ReplyDeleteFabulous! Beautiful project indeed! Thanks for sharing it with us at 613 Avenue Create!
ReplyDeleteHugz,
Chana, Owner