Pages

Showing posts with label apc. Show all posts

Monday, March 16, 2015

Altered Playing Card Challenge Week 26

Oh my gosh, only one more week to go for The Altered Playing Card Challenge, Wow. How fun has this been? I've had a great time and I can't believe it's almost over

We are now onto week 26 of this challenge


If you have missed any of the previous week's here are the links

and our Facebook group

and the Pinterest Board link
Pinterest Board

This week I wanted to focus on something called Monochromatic which basically means creating something with one color in many different shades. You can also use white or black in a monochrome project. 

I am no good with monochrome and it's a tough concept for me so this week will be a sort of challenge for me as well.

I started out with two different printed papers, one was a light teal color and the other was purple


I then grabbed some stencils, both of these are by Dylusions


For the next step I used acrylic paint but feel free to use inks if you choose
I did the purple card first and used a slightly darker shade of paint along with the stencil
( I like to use sponge dabbers with paint and stencils, you don't want too much paint on your dabber, I usually dab in the paint and then dab onto the craft sheet a few times and then begin to work)


For the second teal card, I did the same


Working with the teal card first, I first added a bit of ink around the edges


I then used my fine tip Bic marker and doodled a bit 


I then stamped Roc Nicholas's stamp called Screaming Bunny onto white card stock and colored him with copics
I used several different shades of teal for this


I then cut my bunny out

I used a different color ink to stamp Bla Bla Bla by Jill Penney and Daniel Torrente onto my background, then adhered my bunny and my words Even Silence Speaks By Jo Capper-Sandon
Here is my finished card

For the purple card I first used ink to edge my card


I then used my white gel pen to created some doodles here and there


I added some wash tape, I like to tear my washi tape and then add it to my backgrounds


I stamped  Mervynboy and Hat onto white card stock and colored them with several different shades of purple


I added the Goody, goody gumdrops sentiment last
Here is my finished card

and here are my two cards together


I hope that you will try this monochromatic theme this week. You don't even have to do yours like I did mine, as long as the concept is the same. The same colors in different shades.
Have fun this week, next week is out last and we will have a huge giveaway!! So come back!
Cheers!

Monday, February 23, 2015

Altered Playing Card Challenge Week 24

This is so crazy, we are on week 24 of this challenge, just a few more weeks to go. I am so glad that so many people have hung in with me on this one, it's been so fun. I really don't want it to end. 


If you have missed any of the previous week's here are the links

and our Facebook group

and the Pinterest Board link
Pinterest Board

How many of you have a gazillion washi tape rolls?
 (gazillion = more than you can count haha)
Well, I know that I have way more than I need but I just can't stop buying the stuff.


I thought we could use that washi tape this week 
(note: if you don't have washi tape, you can use printed paper cut into strips)

For my first Altered Playing Card I grabbed a few rolls that I thought would look nice together


I'm going to use my glue stick for the tape because even though the tape is sticky I don't want it trying to fall off my altered card


All I'm going to do here is line up my washi tape to make stripes for my background
Each time I use tape, I add glue underneath it
so... glue, add tape, glue, add tape, glue, add tape


Once I'm finished adding the tape to the entire card I trim the edges and this is the background for my first card


I repeated the same steps for my second card
if I put my wash tape in the stack first I can see what they will look like together prior to putting it on my card


 I didn't like how thick the red polka dot tape was so I simply cut it into a thinner strip


If I Follow the pattern of dots I can then cut it straight


and lastly trim the edges.... here are my two backgrounds together


For the first card, I'm going to use a new release stamp from Stampotique, this one is called Rudy and is by Daniel Torrente

After embossing and heat setting my image I colored with copic markers, I then cut the seahorse out


I used my prismacolor marker to go around the edges of my seahorse to add a black out line

I wanted to create a circle to lay behind the seahorse so I used a piece of white card stock and my archival inks, simply smudge some of the ink onto the white paper


I then cut a circle with Tim Holtz's movers and shaper small circle 

and then edge with black archival ink


This circle will go behind my seahorse

Here is my finished playing card, I think the circle allows my seahorse to stand out a bit more


For my second card, I used a new die from Tim holtz and cut out a butterfly from white card stock, you are not going to use the butterfly that you cut out, your going to use the template remaining.... (note: be sure that you have enough paper to cover your entire altered playing card)


Next, I used blue archival ink to stamp some pretty writing 


I didn't like how bright the white card stock was so I used some archival ink to color my paper slightly


for the next step I'm going to use glossy accents as my glue (the washi tape is slick and I want to make sure I use a good adhesive) I am lining up the edge of my cut out image to the edge of my APC, this is how I'm lining up my butterfly
the only part of the washi tape showing should be the center of my butterfly 


Once the butterfly was glued onto my APC I then cut the excess off, this is the view from the backside of my altered playing card, I just cut off all that excess paper


I added some more orange archival ink onto white card stock again but this time I made it a bit darker. I stamped my words with black permanent ink


I then cut my words out and glued over the butterfly, I also edged my entire card with the same orange ink


Here is my finished card


and here are my two cards together


I hope you have a blast working with your washi tape this week. If you don't have a lot of washi tape like me you can always use printed paper, just cut them into strips and glue them on......
CHEERS!
See you all next week!

Monday, February 2, 2015

Altered Playing Card Challenge Week 21

Can you believe this crazy weather? I wish all those people on the east coast well, I hope you all are warm and safe.
This is week 21 for our Altered Playing Card Challenge!!


If you have missed any of the previous week's here are the links

and our Facebook page

and the Pinterest Board link

I told you last week that we were going to use clear embossing paste this week and so we are.
I really like clear embossing paste and I don't use it enough
For starters I used stencils along with the paste to create some texture in my background, you just smooth it on like embossing paste


You have to set them aside to dry, I let mine dry about 2 hours. I think you can heat set the paste, just be careful 
Once the paste was dry I took my first card and used Dina Wakley paint for my background. I used a sponge and just dabbed it on (note: if your not into bright colors please feel free to use more muted or neutral colors, your cards are yours so please make them the way you like them)


before the paint dried I took a baby wipe and went over the raised areas and wiped the paint off


Again with another color

Paint and then wipe, this is how my card ended up

for my second card I used the DecoArt media paints.. Same technique, dab on and then wipe off
 The DecoArt paint didn't wipe off as well as the Dina paint but I really love how the gesso texture came through as well as some of the stenciled embossing paste

I like the clear embossing paste because it almost looks translucent and when you wipe off the paint it leaves the stenciled pattern.. 

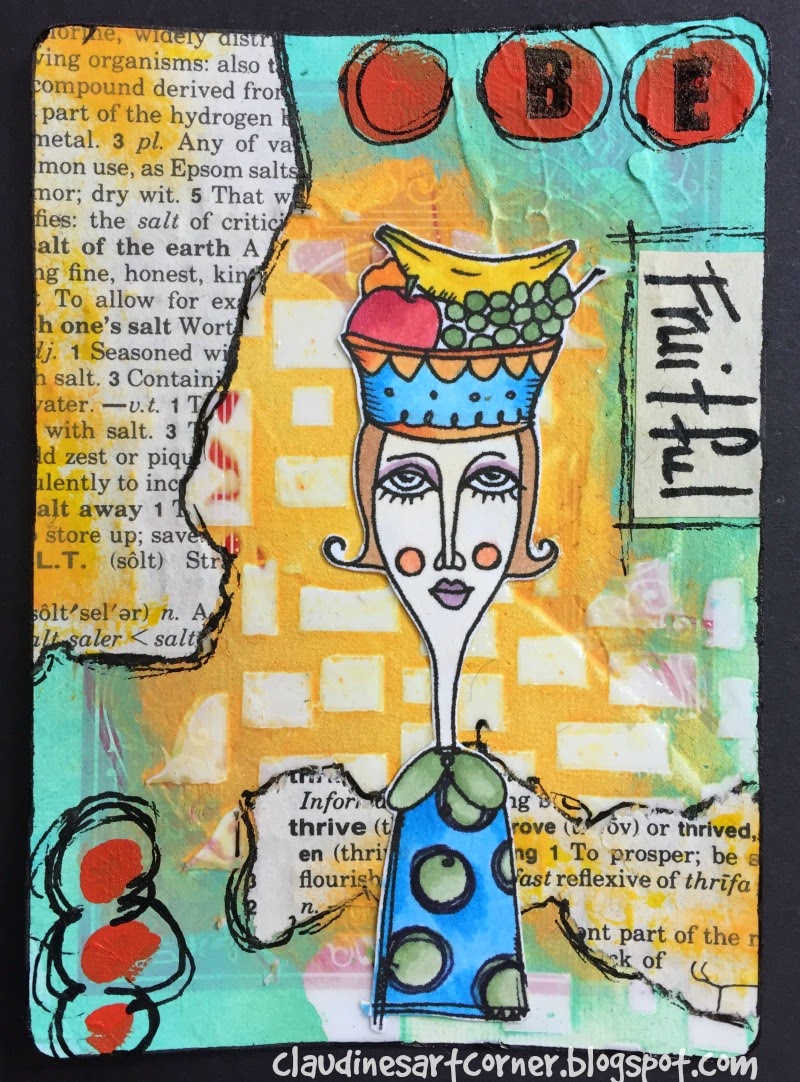
For both of my cards today I am using images from Vera Lane Studios, these ladies are called "Housewives"

After making them the sizes I wanted, I printed them out and then colored them with Copic Markers. I then cut them out

Back to my first card:
Using the DecoArt paints again I dabbed a bit onto my craft sheet and used my pinky finger to make some dots

I then used some torn book pages and added that here and there, I just used glue stick to adhere the pages, I then trimmed the edges
Using my Scarlet Lime journal pen I drew around the edges of my torn pages (I cannot find a link to this pen, I hope it's not discontinued!)


I have all these mini alphabet sets from the Michael's dollar bin, gotta love that dollar bin...
 I decided to go ahead and use one here, I used black ink and stamped the word "BE" onto my circles... I also used my black pen to draw lines around my circle
I then wrote "fruitful" on a piece of the book pages and adhered that to the side


I then adhered my girl, I decided to add another set of circles in the lower lefthand corner and did a little doodle with the black pen LOL... 
Here is my first finished Altered Playing Card


Getting started with card number 2 - I first added a few dots here and there with paint and my finger


I have this zip lock baggie full of used stamps from the US and several different countries and I dug through and found three that I really like, I then used my glue stick to adhere them to my background (I always cut my stamps off the letters I receive for use on other things)

Again, I used my Scarlet Lime black pen to doodle and also drew around my stamps
I also added a tiny bit of yellow paint to my dots at the bottom of my card and tiny bits of orange dots to my upper circles
I added some black tissue tape to a piece of white scratch paper
This is going to be my background for my girl
I adhered my girl to the tape and then cut around her leaving a small portion of the black as an edge


 I then glued my girl onto my background, love the way that black tissue tape makes her stand out

Using some punchinella and a black ink pad, I created some circles here and there

lastly, I added my sentiment (Love Robin Roberts!)
Here is my finished 2nd card


and here are both playing cards side by side


and last but not least the winner of last week's give-a-way is:

I have base coated 37 cards to play along. I ran out of paint. 14 more to go. I'm going to try a valentine theme. I love this idea! I am going to hang them all up as a banner when I finished.

Congrats Paula, please email me at: 
jasminngirl411 at yahoo.com 
with your mailing address for your prize

Thanks all for stopping by, make sure to share your creations with me if your making your own set of cards. I always love seeing what you all have created.